NetworkToolbox – Software user guide
1.General
Please find below some general information about NetworkToolbox and about this manual.
The manual can be opened from inside the App or directly using the following link: http://manuals.creating-your-app.com/NetworkToolbox.
If you prefer a printed version, just tap on the PDF Icon on the website version to download a PDF file.
Please note: In case of issues with the App, you will find a lot of possible reasons and solutions in the last chapter “Common issues / FAQ” of this manual.
1.1.About this App
This App was designed and developed by Marcus Roskosch, an independent developer and founder of creating-your-app.com in 2008.
The main purpose of this App is to allow you to analyze the security of your own network.
For this, NetworkToolbox offers various individual Tools. Tools for information gathering, such as Device, Shodan, Morpheus, Map and Domain, and tools for in-depth analysis or connection by using certain protocols or ports.
All tools are tied together allowing easy switching between tools.
For instance, after locating your network via Shodan, you can directly ping and even scan the network, and once you have identified open ports, you can directly access each port by selecting the appropriate protocol. All findings can then be bookmarked for later reference.
Also, content, links and addresses can be downloaded, printed or exported via e-mail.
Last but not least, a Glossary is included that explains terms from A , “Access control” to Z, “Zero day”.
This manual describes how to use each individual Tool and the App in general.
Legal
This App is designed to assist users in analyzing their own networks, or networks which they have been given permission to analyze in order to determine the security of such networks.
It is not intended to assist with analyzing remote sites with the intention of breaking into or exploiting services on those sites, or for information-gathering purposes beyond those allowed by law.
I hereby disclaim any responsibility for actions taken based upon the information in this App, and urge all who seek information towards a destructive end to reconsider their life, and do something constructive instead.
2.Using the App
The App has five sections:
- Tools – With all individual Test and information-gathering tools
- Logbook – Where you can find all collected data such as Links, IP Addresses etc.
- Resources – With Tutorials, Samples and background information
- News – My News Blog with Network and security-related news
- Settings – To customize this App
To switch between sections, just tap on the lower Tab-bar Icons:

3.Tools
On the main Tools screen, you will find all the individual Tools of the App which can be started by tapping the icon, just as you do with the App icons on the main, home screen of your iPhone/iPad device.
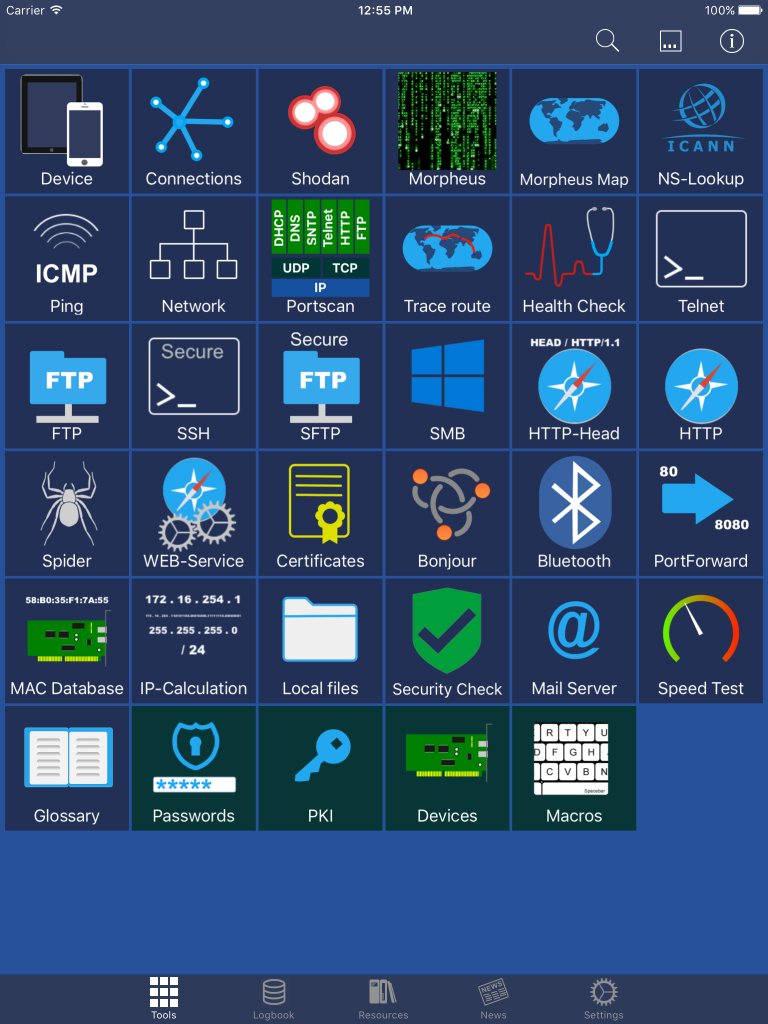
The Action button […] at the top lets you switch between icon-view and list-view of the tools.
The Spyglass ? Icon at the top can be used to search for a particular tool by entering a search term. Searching for FTP for instance will return the FTP and SFTP Tools as well as the Glossary Tool with the definition of the term FTP.
Using the Tools
All tools work in a similar way. Some tools are a little different, depending on the purpose of the tool.
After you have opened a tool by tapping on its icon, you will see some entry fields in the upper part of the screen. Simply enter the information you want the tool to analyze.
For some fields, there is a Selection button ☰ . By pressing this button, you will get a list of possible values for the entry field. For instance, for the Port field, you will get a list of commonly used ports. However, you can also enter the value manually, and you can even enter values that are not in the list.
Further below, there is usually a Connect, Scan, Start or Search button which performs the desired action of the Tool.
The following example shows the Morpheus Tool:
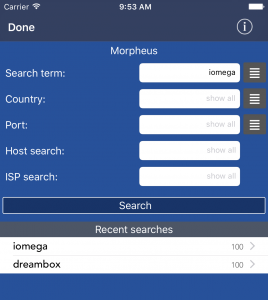
The Recent list
Below that button, you will see a “recent list”. This list contains results of previous analyses. For most of the tools, pressing here recalls the entries of the upper entry field from previous analyses . Finally, it goes straight to the results of your last analysis as if you had pressed Connect or Start.
In some cases, such as search tools like Shodan or Morpheus or the Port- or Network scan tool, another search will not be started but instead will conveniently show you the results of your last search and no extra time-consuming search is necessary. If, however, you want to perform another search, you just need to go back and press the Search button again.
The command-bar
Some tools offer a command-bar at the top like here in the FTP Tool with Directory Commands such as .. / CD MD RD DEL and REN:
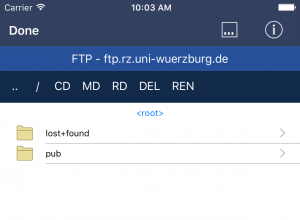
The command-bar, located between the content screen and the navigation bar, contains buttons depending on the current situation. For instance, if you select the FTP protocol in the Telnet tool, you will see a different set of commands than you would had you selected the Telnet protocol.
The command-bar buttons can be scrolled horizontally if they don’t fit on one screen (which is often the case on the iPhone). If a button is highlighted yellow instead of white, it indicates that this function has been pre-selected, being the one you are likely to want to use.
The […] Action Button
The Action button […] can be found in different locations. It can be used to perform further actions depending on whatever is currently selected. After tapping the Action button, a menu with context specific options will be displayed.
The Action button at the top of the tools can often be used to copy, print, e-mail or add the contents to the logbook for further analyses.
Wherever a host name or IP address is displayed, perhaps as a result of a search, the action button […] can be selected and various options for proceeding from there will be offered.
This functionality allows you to jump easily between the App’s tools.
This way, you can drill down your search results by further applying individual additional tools.
Below, you can see the Selection button ☰ and […] Action button in action:

The list that pops up after the action button […] has been tapped on an IP address or host lists all the tools that are available in NetworkToolbox. The most appropriate tools are highlighted by a light blue color and the list will directly scroll to this section. In addition to the tools, there are also entries for:
- Copy – to copy the IP address or Host name to the pasteboard
- Add to logbook – To add the selected entry to the Logbook (see chapter Logbook of this Manual)
- E-Mail – to send the selected entry via e-mail
- Wake on LAN – to send a Wake-Up call to a Network Device which supports this feature
3.1.Device
 This tool provides Network, Hardware,
System and Sensor information about your iPhone or iPad.
This tool provides Network, Hardware,
System and Sensor information about your iPhone or iPad.
How to use
Just start this tool and select, which kind of information you like to see. All available information is divided into the following categories:
- Network – With information about your current IP Addresses, WiFi and Cellular Information, Network Interfaces and Proxy information
- Hardware – With Device information such as Accessories, Battery, CPU and Bluetooth
- System – With information about Model, Localization and Memory usage
- Sensors – With information about the various Sensors such as Gyroscope, Accelerometer, Pedometer etc. Please note, by accessing this tool first time, you will be asked to grand access to Motion and Fitness data. If decline access, no data can be displayed. (PLEASE NOTE: APPLE FORCED ME TO REMOVE THIS SENSORS SECTION IN VERSION 12.9)
- URL-Cache – With information about the Browser URL Cache usage. Tap on Clear Cache to empty the cache.
- Cookies – With information about Browser Cookies (please note: seeing a guestkey here from .isc.sans.edu is normal as this comes from the internet storm center – see more under Resources)
- Pasteboard – Here, you can see the contents of the pasteboard (aka clipboard) with detailed information about possible different format, data is stored in the pasteboard. Tap on Clear Pasteboard to empty the pasteboard.
- Fonts – Shows a list of available fonts, installed on your device.
Just select the desired category. Some more values might be available by further drilling down the categories.
Please note: In the past, the Device MAC Address has been offered here. Since iOS 7, Apple hides the MAC Address for security reasons so they are no longer available.
Please also note: Besides SSID and BSSID, no further information about your WiFi connection (e.g. signal strength, channel, other available WiFi networks) can be displayed by any App. Apple has restricted access to this information to their own Apps and the iOS itself.
3.2.Connections
 This tool is useful if
you want to identify Apps that are generating undesired network
connections.
This tool is useful if
you want to identify Apps that are generating undesired network
connections.
Basically, this tool lists all currently or still open or recently closed network connections on your device.
For your convenience, the connections are broken down into:
- External TCP connections – which contains all connections to other devices
- Internal TCP connections – which contains all connections between Apps and processes on your device
- UDP Connections – which contains all other stateless connections
After tapping on one of these categories, you will see a list of connections with their corresponding source and destination addresses.
When tapping on such an entry, you can see more details of this connection and perform further analysis.
Under Resources, Tutorials and Identify hidden App connections you will find a tutorial which explains how to use this Tool to find undesired network connections of Apps on your device.
Please note: With iOS 10, Apple restricts access to the API which is being used by this tool so on iOS 10 or newer, this tool no longer works.
However, the same features of the Connections tool can now be performed with the Pi-hole tool. Read more about this here.
3.3.Shodan and Morpheus

 Shodan and Morpheus are search engines
that let you find devices such as computers or routers on the Internet.
You use them just as you would use Google to search the Internet for
websites containing specific terms.
Shodan and Morpheus are search engines
that let you find devices such as computers or routers on the Internet.
You use them just as you would use Google to search the Internet for
websites containing specific terms.
More information about device searches can be found in the chapter Device search with Shodan or Morpheus in this Manual.
For further details about the special Shodan settings, please have a look
at
Shodan settings
Morpheus is an alternative to Shodan. Like Shodan, it is a device search engine and can be used to search for certain Servers, Routers, Set-Top Boxes and other devices on the Internet. Morpheus’ strength lies in its searches for Ports 80, 21 and 443, whereas Shodan searches for additional ports. Morpheus also has newer database entries and only keeps older entries if they continue to be accessible.
Both search engines have their pros and cons and it’s probably a good idea to try both engines when searching for a particular device.
Please keep in mind, Morpheus is currently in Beta testing and might be offline or slow at times.
How to use
Just enter a search term you want to look up. You can also select one of the more popular search terms by pressing the ☰ button and selecting one of the listed entries.
In addition, even without using a specific search term, you can also specify a country, a port, a network name, a host name or an operating system as additional search parameters.
Please note: The country needs to be entered abbreviated (eg us for USA or gb for the UK). Alternatively, you can select the country by using the ☰ button.
It is important, to enter good search terms or search criteria. Otherwise you will get too many results or no result at all. As a good starting point, you can use the HTTP-Head tool and inspect similar websites or devices and look for specific terms in the HTTP Header, which can be used as search term.
Once you press Search, the Shodan or Morpheus database will be queried. The results will be displayed in a list. This list shows the host name, if available, in the title of each entry along with detailed information such as IP address, operating system, location and actual device response.
If you tap on the action button […] , you can further analyze that device. If you tap on a line, you will see further details about this particular device. When tapping here on the Location, the Location of the device will be displayed on a map. Under Info, the complete Response of the device will be displayed which is, what the HTTP Head tool would be display for this particular device..
Please note: It is up to you and depends on the law in your country on where you are allowed to proceed from there. Up to this point, you will just see what a device responds to anybody who connects to it. This information will be sent also for instance if you visit this particular device with your web-browser. But in that case, the browser will not show you what it receives from the server and only displays the website. It can be interesting and useful to analyze such responses but it will definitely not be allowed to use this tool to find and break
3.4.Morpheus Map
 This tool uses Morpheus
to search for devices within a certain distance of a given location.
This tool uses Morpheus
to search for devices within a certain distance of a given location.
You could, for example, use the tool to see if your own devices have been found by Morpheus.
More information about device searches can be found in chapter Device search with Shodan or Morpheus of the help text.
How to use
Just enter the central point of your search manually by entering the Latitude and Longitude values or press the ☰ button. On the next screen, you can either tap on the map to pin the location from which you want to search or tap the Spyglass ? Icon at the top and enter an address in the upper search field. If you leave this screen by tapping the back button, the corresponding coordinates will be used.
Next, enter a maximal radial distance from the center for your search.
Finally, you can also enter a search term as in the Morpheus or Shodan tool, but you can also leave this field empty.
Once you press on “Search for networks”, the Morpheus database will be searched for devices in the particular area. If devices have been found, they will be displayed on a map. If you want to see the results in a list, just use the corresponding button in the upper right corner.
3.5.Inspect
 This tool is basically a general purpose
tool to get any kind of information about a certain IP Address or host.
This tool is basically a general purpose
tool to get any kind of information about a certain IP Address or host.
This tool combines a Whois search, NS Lookup, Reverse Domain Lookup and general IP Information tool. It is useful should you wish to discover the provider and location and DNS (Domain) information about an IP address or hostname or just the IP Address of a host or vice-versa.
How to use
Just enter an IP address or hostname in the entry field and press Search.
The result will show (if available):
- Domain – The domain name of the IP address
- IP address – The IP address of the domain
- Country
- Location – The estimated location (press > to see the address on a map)
- Provider – The provider hosting this address
- DNS Record information – MX-, NS-, SOA- and TXT- entries
And more information about DNS Records or Internet Storm Center Attack information if available.
3.6.Whois
 This tool provides information about a
registered domain.
This tool provides information about a
registered domain.
It starts searching for the registrar of the domain and drills down to the registration record of the corresponding registrar. Often, such a tool is called Deep whois.
Whois query results are not standardized. Several registration authorities provide their information in various formats and at different information depths. This is, why websites or other Apps just provide raw text output of the results or they charge for individual structured results.
However, this tools tries to interpret the query result and to present it, in the usual, structured format. In some cases (e.g. for whois.nic.uk), where this is not possible, you may also see just raw information.
How to use
Just enter a domain name and press Start Query.
In case the domain name you entered includes one or more subdomains (e.g. mail.yahoo.co.uk), the tool will convert the name to the base domain name. (e.g. mail.yahoo.co.uk will be converted to yahoo.co.uk or mail.google.com will be converted to google.com).
On the result list, you will first see information about the registrar under the IANA Information section. As this information is not necessarily provided by the usual whois.nic.DOMAIN registrar, this section might also contain valuable information.
On the next section, you will see all information provided by the registrar about the domain. The level of details of this section is different from registrar to registrar.
3.7.DNS
 This tool allows you to query an individual DNS
Server for a domain.
This tool allows you to query an individual DNS
Server for a domain.
When a domain name needs to be converted to an IP Address (e.g. when browsing to a website), the DNS Server configured in your router will be used. This can be the DNS Server of your Internet service provider or another DNS Server you may have configured manually in your router. In this case, this standard DNS Server will be queried and if that doesn’t find the requested domain, it will drill down until it finds the corresponding DNS Server for the domain, just like the included whois tool does (see whois for details).
The Inspect tool also only provides information based on the standard DNS Server.
This tool however, let’s you query any individual DNS Server for domains. This is useful, if you want to debug your DNS Settings or want to find out, if DNS Settings already have been distributed to other DNS Servers.
Furthermore, this tool also displays the response times for the queries. This way, you can compare the results of different DNS Servers and chose the fastest for your own network.
How to use
First, enter the Domain you would like to look up.
Next, enter the IP Address of the DNS Server you would like to query. By hitting the ☰ button, you can also selecting one of the pre-defined DNS Servers from the list.
3.8.Ping
 This tool can be used to test the
reach-ability and availability of a network device.
This tool can be used to test the
reach-ability and availability of a network device.
You can also see the ping time in milliseconds to compare or check the speed of a connection.
How to use
Just enter the IP address or domain to be tested. After you press the Ping button, another screen will show.
Here you will see the response time in milliseconds for the particular destination both in the list and also as a diagram at the bottom.
If advanced is switched on, additional values such as ttl (time-to-live) and the ping packet size can be entered. It is also possible to force IPv4 or IPv6 pinging.
If advanced is switched off, these values will be set automatically based on the IP Address or domain that has been entered and based on best-practices.
3.9.Network Scan
 This tool performs a Network-Scan of a
given IP Address range.
This tool performs a Network-Scan of a
given IP Address range.
This is useful, if you would like to get an overview of all devices on a network.
More information about network scanning in general can be found in chapter About network scanning of this manual.
How to use
Enter both a start IP address and end IP address for your scan and press the Scan button.
Next, you will see the progress of the scanning procedure while found devices will be added to the list until the complete address range has been scanned.
You can further analyze each entry by tapping on the action button […] on the corresponding entry in the list. For instance, you can perform a Port-scan for each individual IP Address.
You can also enter the IP address range in slash notation (net/mask). E.g. 192.168.1.1/24 means to scan from 192.168.1.1 to 192.168.1.254 or entering 192.168.1.1/16 will scan up to 192.168.255.254.
You can also enter IPv6 addresses here.
Quick Scanning
Use this option, if you quickly want to get an overview of the components in the IP Address range. The results are not as accurate (complete) as a full scan but you can press the refresh button to repeat the quick scan.
Advanced Scanning
Switching this switch to ON will cause the scanning engine to use further techniques to obtain as much information as possible to an individual device on the network.
This feature has been introduced since MAC Addresses can no longer be obtained on iOS 11 (see note further below). The consequence was, that not even the hardware vendor of a particular device can be displayed. Until iOS 11, this information was quite useful to identify the device.
The Advanced scanning feature will now add as much additional information as possible to the result list. In some cases, this may even include the MAC address where it is possible to find the MAC address using other techniques. Often, it will provide at least as much information to give you an idea which device is behind a certain IP address. In some cases, even this feature can not provide any further information.
Turning on this feature will make most sense for local network scans but also for external IP address scans where – of course – no MAC Address can be displayed.
In some cases, you may want to turn this feature OFF to just run a plain network scan as the advanced features are generating additional network traffic to obtain the additional information.
Check for Web Interfaces
When switched ON, this tool will look for web interfaces on each of the found IP addresses. If a web interface was found, you can easily jump to the interface when opening the details page of the scanning result.
This is basically a convenience feature. The same can be achieved by performing a port-scan (see Port scan tool) on an individual IP address of the scanning result.
As looking for web interfaces on all IP addresses of the scanning result takes some time, this feature can also be switched OFF.
Details
When Advanced Scanning and/or Check for Web Interface have been switched on, the result list contains markers indicating the following:
| A | Active. IP can be pinged. |
| W | Web Interface found. |
| B | Bonjour services found. |
| U | UPnP services found. |
| S | Samba (Windows) services found. |
PLEASE NOTE: Since iOS 11, it is no longer possible to obtain MAC addresses by any App since Apple has removed access to MAC addresses for security and privacy reasons.
3.10.Port Scan
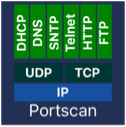 This tool performs a port scan of a
specified IP Address or Domain.
This tool performs a port scan of a
specified IP Address or Domain.
This is useful if you wish to find out whether necessary services like HTTP, FTP etc. are available as expected or if you wish to check if more ports than necessary are accessible which might then be a security issue.
More information about port scanning can be found in the chapter About port scanning of the help text.
How to use
Enter an IP address or domain in the first entry field. IP Addresses can be entered as IPv4 or IPv6 Address. For your convenience, you can also press the selection button ☰ next to the Address field to select your Local IP Address or IP Addresses recently used throughout the App.
Next select a scan range by either entering all Ports or Port ranges you wish to scan, separated by commas (or ranges by using the dash/minus sign e.g. 10-100 means Ports 10 to hundred) or any combination of commas and dashes.
Or tap the selection button ☰ next to the Port field to select one of the predefined port ranges. Select Default to cover the most common and important ports.
Next, press Scan to perform a port scan. Now you can see the progress of this scanning process while all open ports will be added to the list.
By using the action […] button on a particular entry on this list, you can perform further actions. For instance, you can use the HTTP Tool for an open Port 80 to see the results of a Web connection to this IP Address on that Port.
By tapping on the line itself, you will get more details about the Port including a Description of the common use of this particular Port.
3.11.Network Neighbors
 The Net Neighbors tool displays the
contents of the so-called ARP Table (for IPv4) or NDP Table (for IPv6).
The Net Neighbors tool displays the
contents of the so-called ARP Table (for IPv4) or NDP Table (for IPv6).
These tables are providing information about devices (IP Addresses) on
your network that have once be seen or are still communicating with your
device.
For this reason, this Net Neighbor tool is a valuable addition to a
Network Scan.
A Network Scan always lists all devices that can currently be reached. It is basically a snapshot of the current network situation.
Some devices might be missing in a Network Scan because they might not actually be ‘reachable’ at the time of the scan. Or they may got woken up by a scan very slowly and did not yet respond to connection request.
Such devices can be found with the Net Neighbors tool.
This tool also helps to find out how a device is connected to your device because, different to the Network Scan, this tool also shows the Interface (e.g. WiFi or Cell) for each discovered device.
How to use
First, decide whether you want to get results for IPv4 Addresses or IPv6 Addresses.
Next, you can enable Resolve hosts. If enabled, after the Scan, Network Toolbox will try to find out the network names for each discovered IP Address. This may take some time so it can be disabled if not really needed.
The Hide Expired switch will remove all entries from the result list which are no longer valid. This results in a shorter list. However, sometimes it might be interesting to see which devices have been communicating to your iPhone / iPad even if it has been some time ago.
After tapping the Start button, you will see the list of IP Addresses grouped by network interface.
Tapping further on an entry will reveal additional information.
3.12.Routing Table
 The Routing tool was previously
integrated (slightly hidden) inside the Devices tool but is now
available as separate tool with additional features and information.
The Routing tool was previously
integrated (slightly hidden) inside the Devices tool but is now
available as separate tool with additional features and information.
The Routing tool lists all routes to a particular network destination. The routing table is primary constructed automatically by your iPhone or iPad.
How to use
First, decide whether you want to get results for IPv4 Addresses or IPv6 Addresses.
Next, you can enable Resolve hosts. If enabled, after the Scan, Network Toolbox will try to find out the network names for each discovered IP Address. This may take some time so it can be disabled if not really needed.
The Hide Expired switch will remove all entries from the result list which are no longer valid. This results in a shorter list. However, sometimes it might be interesting to see which devices have been communicating to your iPhone / iPad even if it has been some time ago.
After tapping the Start button, you will see the list of IP Addresses grouped by network interface.
Tapping further on an entry will reveal additional information.
Unfortunately, Apple decided to hide all MAC Addresses to any App. For this reason, some entries will be displayed without (or blank) Gateways. In that case, the Gateway is a physical network device which is only being identified by its MAC Address – which can not be discovered due to the missing MAC Address.
However, for some devices, especially for IPv6 connections, Network Toolbox is still able to identify the Gateway’s MAC Address. In this case, it will be displayed and the details page will show the device vendor name which may help to identify the device.
3.13.Traceroute
 This tool analyzes the
path or route of the data from your device to any destination IP address
or host.
This tool analyzes the
path or route of the data from your device to any destination IP address
or host.
Before data, such as a request to display a certain website, ends up at the destination IP address, the data is received and passed on by many additional nodes such as routers.
The speed of the connection will depend on the number of such additional nodes and the utilization and bandwidth of each node.
How to use
Enter the destination IP address or host.
Once you tap the Trace route button, you will see a new screen and the tool will attempt to identify all nodes along the path to the destination.
Each node will be displayed along with its network name, if available, and its IP address. By tapping on an entry, further analysis can be performed by selecting one of the other tools. For instance, the domain info tool can be used to discover the provider of, or organization associated with, the node and even its location.
The Action button at the top can be used to copy, print or e-mail the node list.
If advanced is switched on, additional values such as ttl (time-to-live) and the timeout and max. attempts can be entered. It is also possible to force IPv4 or IPv6 pinging.
If advanced is switched off, these values will be set automatically based on the IP Address or domain that has been entered and based on best-practices.
When entering IPv6 Addresses along with a Port number, you need to use the [n:n:n:n:n:n:n:n]:port notation.
The Max TTL value represents the maximum number of nodes that should be analyzed. The default value is 20. Trace route will stop either when the destination host is reached or when the maximum number of hosts entered in this field has been reached.
The timeout value needs to be increased if slow nodes are involved. However, a value of 100 should be fine here.
Max. attempts means the number of times the tool should try again after a node connection has failed. The default value of 5 should work in most cases.
Visual Traceroute
A route can also be displayed on a map, to see how traffic travels to the destination.
For this, you can use the map/globe icon at the top right hand corner. Tapping this button will toggle between map and list view.
PLEASE NOTE: The locations, displayed on the map, will start at the first discoverable server (not your actual current address as I don’t want to allow my App to discover your current address).
Also, these addresses might be inaccurate as it is sometimes not possible to identify the exact location of an IP address.
3.14.Health Check
 This tool helps to
quickly monitor a number of networks (IP Addresses or hosts) in one
step.
This tool helps to
quickly monitor a number of networks (IP Addresses or hosts) in one
step.
This way, you can quickly find out if any of the network components on your network or any of a set of Web-Servers are working correctly or may have an issue.
How to use
On the main screen, press “Add” to add a new Check List. After entering a name confirm by tapping the Check button at the top of this box.
Next you will see a new entry line on the Check List with the name you previously entered. Tap on this line, to open the details page for this Check entry.
Now you can add individual single IP Addresses or Host names by using the “Add” button.
If you want to Add tests for multiple IP Addresses or Hosts, use the “Add multiple” button. Here, you can enter a list of IP Addresses or Host Names, separated by Comma (,).
For each entry, you can choose which test should be performed. This could be a simple Ping test, which just checks the availability and response time or more sophisticated tests like a POP3 Mail Server test which will check whether or not the Mail Server is running. Just choose your desired test that should be performed by tapping on “Please select a Type” and select a Type from the list like here:

Depending on your selection, you will see additional parameters to check for. For instance, for HTTP Tests, you can check if a HTTP-GET Request will return a certain Text or for a Certificate Test you can enter the Expiry in days. A test will be seen as failed if one or more of the additional criteria don’t match.
Once you have entered the values you would like to check, you can press the Test button to perform a single test with the given values.

Here, the HTTP Test on domain www.test.com succeeds in 441 milliseconds. If you were to enter 200 in the Timeout field and perform another test, this test would fail as the actual response time is higher than the required.
Press the Check button at the top of this screen to complete adding a new Test.
You can continue to add more Tests to your list as desired. Once completed, you can perform a Test on all entries in this list one after the other by tapping the Start button at the top.
For each individual test, a green check-mark will indicate a passed test whereas a red cross indicates a failed test. By tapping on the line, you can see the reasons for the failure.
3.15.Telnet
 This tool was formerly called
Socket Tool as it basically offers a general purpose IP
connection where everything received after connecting to a certain IP on
a certain Port will be displayed on the screen and everything everything
typed will be sent back to that Address.
This tool was formerly called
Socket Tool as it basically offers a general purpose IP
connection where everything received after connecting to a certain IP on
a certain Port will be displayed on the screen and everything everything
typed will be sent back to that Address.
However, the most common use of such a Tool is a so called Telnet Terminal connection to Port 23 which is the reason why this Tool is now called Telnet Tool.
Nevertheless, it can still be used to analyze any kind of connection, even HTTP, FTP, POP3, IMAP, SMTP or any other connection.
Often, it is useful to connect to a certain Port using this tool before using a dedicated tool for a certain Service as this Tool shows a lot of useful information which helps to analyze an Address at a certain Port.
Once connected, this tool shows everything that is received from the server, and everything typed in via the keyboard will be sent to the server.
This tool is ideal to see if a certain service is active and to analyze the information provided by a certain service. It can even be used to retrieve e-mails from a mail server or to perform a password test on an FTP server (see the chapter password test of the manual).
How to use
Enter an IP address or host in the first entry field. IP Addresses can be entered as IPv4 or IPv6 Address. For your convenience, you can also press the selection button ☰ next to the Address field to select your Local IP Address or IP Addresses recently used throughout the App.
Next enter the Port you would like to connect to by either entering the Port manually or tap the selection button ☰ next to the Port field to select a Port from the list.
Next press Connect to get connected to the Address. After connecting, everything received from the Address will be displayed. Usually you will see some kind of welcome message.
Protocol
Depending on the port you have selected, a protocol will be applied automatically. However, if the protocol is unknown or you wish to use another protocol, just press the action button […] and select another Protocol.
Depending on the selected protocol, different commands will be available in the command-bar.
You can use the commands to send a particular command to the server. For instance, when connected to an IMAP server, you can use the “EXAMINE INBOX” command to get an overview of the e-mails residing in the Inbox. Some commands will ask for additional parameters before being sent.
The commands offered here are only the most commonly used commands or the most useful commands. You can, in fact, enter any individual command by just typing on your keyboard.
Additional settings
In addition to the Protocol, the action button […] offers additional settings and options such as:
- Copy – to copy the contents of the display to the Pasteboard
- E-Mail to send the contents via E-Mail
- Print – to Print the contents
- Add custom password – Once you used the Login button (only available for certain protocols) to submit a username/password pair, you can use this selection to add this pair as new entry to the custom password list (see here)
- Wrap lines – to automatically wrap lines if they reach the right end of the screen
- Echo – to also display all characters typed in
- Show HEX Chars – to reveal characters that are usually invisible by showing the Hexadecimal representation
- LF -> CR/LF – to convert line-feeds (Enter key) to carriage-return + line-feed. Some Servers may need this setting to be turned on.
To send special characters, not available on the Keyboard, just hit the Key button at the top and select the desired character from the list.
The Telnet Tool also offers the possibility to submit contents from a previously created Macro by hitting the Macro button at the top and selecting the desired Macro name (See here for more information).
3.16.FTP and SFTP

 The FTP and SFTP Tools provide file
browsing and downloading functions to network devices that have this
type of service enabled.
The FTP and SFTP Tools provide file
browsing and downloading functions to network devices that have this
type of service enabled.
Please note: As iOS doesn’t offer any kind of shared directories, files downloaded by these tools will end up in the separate local file browser Tool. Also, if you want to upload files, you need to use the local file browser Tool to upload the file to your iPhone or iPad.
How to use
First enter the host name or IP address of the server to which you wish to connect. Then enter the port number: 21 for FTP or 22 for SFTP. However, any other port number can be entered as well.
For SFTP you have to provide a username and password right at the beginning if the server requires authentication. For FTP this is optional and can also be entered later or along with a password test.
For SFTP you also can provide a Public / Private key combination instead of a password, see further below under PKI of this Manual.
The credentials entered will be sent to the server automatically after connection. If these credentials are wrong or if no credentials have been entered at all, the password test tool will be started automatically. For more information see the chapter Passwords of this Manual).
Once connected you will see the current directory of the connected server. In this view, you can change directories by just clicking on directory entries.
The command bar at the top offers various commands to change directory, alter files and even to download or upload files. The commands in the bar can be scrolled horizontally if they don’t fit on one screen.
The functions can be used as follows:
- .. – to change one directory up
- / – to change to the root directory
- CD – to change to a specific directory (the name will be asked after pressing)
- MD – to create a new directory
- RD – to remove a directory
- DEL – to delete a file
- REN – to rename a file
- Download – to download a file
- Upload – to upload a file
- View – to view a file
The integrated file viewer can display txt, html and even PDF files. It uses the corresponding file viewer based on the file extension. If you wish to view a file in a certain file viewer but the file has the wrong extension (e.g. .log files) you would need to correctly re-name the file extension.
If you wish to view the file with any other App on your device, such as your preferred PDF viewer or sophisticated file browser, just download the file to your local storage area and use the open command local files browser tool.
Using Public / Private keys
It is more secure to use Public / Private keys instead of a Password.
This is only possible with the SSH protocol which is used for SFTP but
not for FTP.
In order to use Public / Private keys for a particular server, the server needs to be setup to accept Public / Private keys. Under Resources, Tutorials and Public/Private key Tutorial you will find a tutorial which explains how to setup a Linux server to use Public / Private keys.
To access a server with Public / Private keys, you can use the button Public / Private keys and enter, paste or load the key combinations in the following screen.
Here, you should use the Validate button to verify if the data you have entered is correct.
To maintain multiple keys, you can use the dedicated PKI Tool which is explained here.
Please note: You still need to enter a username for logging in to the server. But you also need to enter a Password if you are using an encrypted Private Key (which is recommended). Once a Private key has been entered, the Password will be no longer the Login Password but the Private Key Password.
If you don’t use an encrypted Private key (maybe for testing purposes), you can leave the Password field blank.
3.17.SSH
 This Tool offers a SSH (secure socket)
terminal connection to a server offering the SSH service.
This Tool offers a SSH (secure socket)
terminal connection to a server offering the SSH service.
SSH has replaced Telnet as Telnet is highly insecure whereas SSH uses an encrypted connection.
How to use
Enter an IP address or host in the first entry field. IP Addresses can be entered as IPv4 or IPv6 Address. For your convenience, you can also press the selection button ☰ next to the Address field to select your Local IP Address or IP Addresses recently used throughout the App.
The usual port for SSH connections is 22 but can be changed here, if necessary.
If you want to use a Public / Private key combination instead of a password, see further below under PKI in this Manual.
Once you press Connect, a connection will be established. After this, you need to press the button marked Login in the command bar. The username and password combination you previously entered will be used if you don’t select any other combination in the list to perform a password test as described more in details in chapter Password tests of the help text.
After connecting, everything received from the Address will be displayed and everything typed on the keyboard will be sent. Usually you will see some kind of welcome message.
Additional settings
The action button […] offers additional settings and options such as:
- Copy – to copy the contents of the display to the Pasteboard
- E-Mail to send the contents via E-Mail
- Print – to Print the contents
- Add custom password – Once you used the Login button (only available for certain protocols) to submit a username/password pair, you can use this selection to add this pair as new entry to the custom password list (see here)
- Wrap lines – to automatically wrap lines if they reach the right end of the screen
- Echo – to also display all characters typed in
- Show HEX Chars – to reveal characters that are usually invisible by showing the Hexadecimal representation
- LF -> CR/LF – to convert line-feeds (Enter key) to carriage-return + line-feed. Some Servers may need this setting to be turned on.
To send special characters, not available on the Keyboard, just hit the Key button at the top and select the desired character from the list.
This Tool also offers the possibility to submit contents from a previously created Macro by hitting the Macro button at the top and selecting the desired Macro name (See here for more information).
Using Public / Private keys
Public / Private keys are more secure than a password.
In order to user Public / Private keys for a particular server, the server needs to be setup to accept Public / Private keys. Under Resources, Tutorials and Public/Private key Tutorial you will find a tutorial which explains how to setup a Linux server to use Public / Private keys.
To access a server with Public / Private keys, you can use the button Public / Private keys and enter, paste or load the key combinations in the following screen.
Here, you should use the Validate button to verify if the data you have entered is correct.
To maintain multiple keys, you can use the dedicated PKI Tool which is explained here.
Please note: You still need to enter a username for logging in to the server. But you also need to enter a Password if you are using an encrypted Private Key (which is recommended). Once a Private key has been entered, the Password will be no longer the Login Password but the Private Key Password.
If you don’t use an encrypted Private key (maybe for testing purposes), you can leave the Password field blank.
3.18.SMB
 This tool allows you to browse for and
connect to so-called Samba Shares or Windows File services.
This tool allows you to browse for and
connect to so-called Samba Shares or Windows File services.
You can browse directory trees or download files by using this Tool.
How to use
Enter an IP address or host in the first entry field. IP Addresses can be entered as IPv4 or IPv6 Address. For your convenience, you can also press the selection button ☰ next to the Address field to select your Local IP Address or IP Addresses recently used throughout the App.
Also, all discovered Samba or Windows Shares will be listed here.
You can either leave the next Username and Password fields empty if the Server you want to connect to offers Guest access. Otherwise enter your credentials here.
Next, just tap Connect to connect to the server.
To change directories, just tap on the Directory entry on the list or use the .. / CD buttons at the top.
To download or view a file, just tap on the file and use the action button […] at the top and select either Download or View file.
Please note: As iOS doesn’t offer any kind of shared directories, files downloaded by these tools will end up in the separate local file browser Tool.
3.19.HTTP Head
 This tool can be used to
analyze the response of a web-server when it is being connected.
This tool can be used to
analyze the response of a web-server when it is being connected.
Web-servers, and even devices with web interfaces such as routers, usually respond with a lot of interesting information when they are connected.
From a security point of view, this information should be as short and as neutral as possible. Some devices, however, even respond with information about default username and passwords.
This HTTP response is what Shodan and Morpheus collect in their databases, and this information is used to identify device types and includes information such as server type, operating system, version etc. Once this information is known, a hacker can look for exploits in this particular device and try to break in.
How to use
Enter the IP address or domain and the port number, which is usually 80 for websites, and press Check.
The tool will then try to connect to the web-server and will show what the web-server responded after it connected.
The results can be displayed in three different formats HTML, Source or Text by tapping the corresponding command-bar button.
The Action button at the top can be used to copy, print or send the information via e-mail or for further analysis of this server with any of the other tools.
3.20.HTTP
 This Tool basically acts like a regular
Web-Browser but offers several features that help to analyze the
response of a web-server.
This Tool basically acts like a regular
Web-Browser but offers several features that help to analyze the
response of a web-server.
For instance, this Tool can:
- mimic different browser types like Firefox, Safari and even mobile browsers
- Allow login with standard or custom username/password combinations
- Store discovered username/password combinations for later reference
- Test the web-server on common HTTP parameter exploits
- Use different protocols
- Display results in source code, plain text or XML-Tree
How to use
Enter the IP address or website domain in the first field. Enter the port, which is usually 80 for a regular web-server, in the next field. If the website requires authentication, you can optionally enter a username and password in the following fields.
The so-called Agent is the response of a web-browser to a web-server’s request for details of the browser being used to access the web-site (see the chapter Browser agents of the Manual for more information about this subject)
The so called Mime type informs the web-site of the data type (language and format) the browser is set up to receive. This could be HTML, which is the default for a web-browser, text/plain which just shows plain text, and no formatting at all – if supported by the web-site. XML is used for RSS feeds or web-services for instance.
Once the web-server connection has been opened by using the Open button, the content will be displayed as in a regular browser.
If the web-site requires authentication, the credentials entered earlier will be sent to the server automatically. If these credentials are wrong or if no credentials have been entered at all, the “Login” tool from the command-bar (the bar above the browser screen) will be started automatically.
The command-bar
The command-bar, located between the content screen and the navigation bar, contains various buttons. These buttons here can be scrolled horizontally if they don’t fit on one screen (which is often the case on the iPhone). Yellow text on a button (instead of white text), indicates that this function has been pre-selected as being considered the most relevant.
The Login command starts a function that lets you test the server for certain commonly used username and password combinations. For more information see the chapter Password tests of this Manual.
The Test command starts a function that lets you test a server or device for certain so-called Directory traversal exploits. For more information see the chapter Traversal tests.
The Reload command will simply repeat the last request to the web-server and reload the website.
The HTML command will show the content in HTML (Browser like) format. This is the default view. Once selected, the text on this button is highlighted in yellow.
The Source command will show the content as source code.
The Text command will remove all HTML tags and show the content as plain text.
The XML command will display the content in a hierarchical tag browser. This view can also be used to analyze HTML content on an HTML-tag basis and not only to view XML content.
3.21.Spider
 This Tool can be used to analyze (crawl)
a website and get a list of links to other websites as well as a list of
content a website wants to hide.
This Tool can be used to analyze (crawl)
a website and get a list of links to other websites as well as a list of
content a website wants to hide.
How to use
Just enter the domain of the website you wish to Spider and the port, which is usually 80. After pressing Start, the website will be analyzed.
By selecting “Websites” in the command bar, which is the default selection, you will see a list of links the website contains. These links can even be hidden links that are not visible when browsing the website. You can further analyze, or just visit, the link by selecting the corresponding list entry and then selecting the desired tool in the list.
By selecting “Disallowed robots entries” another list will be displayed. This list contains all locations on the web-server that the website wishes to hide from search engines like Google. Most of the search engines will follow this list but some don’t.
The Websites list can be useful to see if your website, or any other specific website, contains links to destinations you are not aware of.
The Robots list can be useful to see what kind of information a website tries to hide or to see if the information you want to hide on your own website is complete.
3.22.WEB-Service
 A web service is a
function that can be accessed by other programs or websites over the web
(Http). Web services are often used to allow other websites or users to
use certain functions of a website without using a website to access the
information. One example is the Google geolocation services.
A web service is a
function that can be accessed by other programs or websites over the web
(Http). Web services are often used to allow other websites or users to
use certain functions of a website without using a website to access the
information. One example is the Google geolocation services.
Web services usually consists of one or more of the following pieces of information:
- URL (sometimes called EndPoint of the Service)
- URL Parameter
- Header
- Body
This tool of NetworkToolbox allows you to analyze and test web services of any type.
There are various even quite interesting public web services available which can also be used by this tool.
How to use
First, you need to enter the Address (Endpoint) of the service you want to use. If necessary, you can also add the port, username and password (which will most of the time not be needed).
Then, you need to enter the service information of the service. For this, just tap on the selection button ☰ on the right side of the “service” entry.
Entering service information
On this screen, you can enter URL Parameter, Header and Body of the service you plan to use. The information that needs to be entered here depends on the service you plan to use and is usually provided in the documentation of the service.
To get an idea for a service or just to test, you can tap on the […] button at the top and select “Load predefined” to load one of the provided sample services.
The […] button also offers the possibility to Save, Load or Delete service information you are entering here on this screen.
Once you have finished entering the service information, you can close this screen with the checkmark on the right side.
Start the service request
Once all information for the service has been entered or selected, you can access the corresponding service by one of the three methods “GET” “PUT” or “POST” and pressing the corresponding button.
Which of these methods you have to use depends on the service. Services can use one or all of these three methods. More information can be found in the documentation of the service.
After the service has been successfully started, the results will be displayed in a hierarchical list that can simply be browsed and drilled down.
Services usually respond either with XML, JSON or plain text. NetworkToolbox tries to identify the response type automatically and provides and appropriate browser for that data type.
3.23.Certificates
 If an organization
wants to have a secure web site that uses encryption, it needs to obtain
and use a site, or host, certificate. Certificates will also be used for
other types of encryption such as E-Mail (via S/MIME).
If an organization
wants to have a secure web site that uses encryption, it needs to obtain
and use a site, or host, certificate. Certificates will also be used for
other types of encryption such as E-Mail (via S/MIME).
This Tool helps to analyze a website certificate. Finding the certificate of an unknown host or IP Address can be very interesting. Often, this tool can reveal not only a single owner of that Address but also which other domains are using the same certificate.
There are two elements that indicate that a site uses encryption.
- a closed padlock, which, depending on your browser, may be located in the status bar at the bottom of your browser window or at the top of the browser window between the address and search fields
- a URL that begins with “https:” rather than “http:”
By making sure a web site encrypts your information and has a valid certificate, you can help protect yourself against attackers who create malicious sites to gather your information.
If a web site has a valid certificate, it means that a certificate authority has taken steps to verify that the web address actually belongs to that organization.
Browsers verify
- a) that the web site address matches the address on the certificate
- b) and that the certificate is signed by a certificate authority which the browser recognizes as a “trusted” authority
So far, this sounds great and very secure. However, recently some certificates have been issued by certificate authorities (CAs) that did not take the necessary steps to ensure that the requestor really is who he claims to be. This way, several certificates even for public websites such as Google have been issued to people who may use these certificates illegally and for criminal purposes.
Some browsers like Firefox have been updated so that they no longer accept and trust certificates from those untrusted CAs such as DigiNotar from the Netherlands or India CCA. On the other hand some browsers such as Internet Explorer and Chrome use the underlying OS for verifying certificates, and usually these browsers are not updated with trusted certificate lists as quickly and as often.
With NetworkToolbox you can verify and investigate server certificates immediately.
How to use
Just enter the website you want to inspect. Either leave the port number as 443 or enter another port number if you need to inspect the certificate of a different service.
Once you press Start, you will see whether a certificate is available and, if so, you will see all the details about the certificate in a readable form.
Most important are the fields “Revoked”, “Self signed”, “Valid to” and the Issuer information.
If a certificate was revoked, no longer valid or even self signed, it should not be trusted, at least if you require high security encryption.
The issuer should be a trusted CA, so if in doubt, just use Google to browse for the name of the certificate issuer to find out if there are reports of issues with this CA.
(As a reminder: just tap a bit longer on the Issuer entry in the list to copy the name to the pasteboard for later pasting in Google – for your convenience)
3.24.Bonjour
 Bonjour is Apple’s implementation
of a so called “Zero-configuration network” technology.
Bonjour locates devices such as printers, other computers, and the
services that those devices offer on a local network using multicast
Domain Name System (mDNS) service records.
Bonjour is Apple’s implementation
of a so called “Zero-configuration network” technology.
Bonjour locates devices such as printers, other computers, and the
services that those devices offer on a local network using multicast
Domain Name System (mDNS) service records.
Bonjour comes built into Apple’s OS X and iOS operating systems, Apple TV and many other third-party devices and can also be installed on Windows PCs.
If you run a Bonjour scan, you might be surprised at how many devices and software on your network is using Bonjour. Such a scan can reveal additional devices that were not found by a normal Network Scan as they may only respond to certain services.
In general, Bonjour devices are not more or less secure than any other devices, and the same rule applies: If you don’t need it, switch it off!
How to use
Once you press Start Scan, your network will be scanned for Bonjour devices and the result will be displayed in a list, or you will see a note that no Bonjour devices can be found.
The list is split into two sections Services and Devices. Both sections contain the same information. The difference is only how to drill down to the information. You can either drill down from a service such as airplay to the devices that are offering airplay services or else use the device list to see all services that a particular device is offering.
The device information usually contains information about the IP address and port which can be used for further analysis. The MAC address will be searched in the MAC database included in NetworkToolbox and this usually provides the name of the Vendor for better identification of the device.
Please note: As bonjour, due to its nature, does not provide a 100% reliable scanning method, further scans might be necessary in order to find all bonjour devices.
3.25.UPnP
 UPnP is another so called “Zero-configuration
network” similar to Apple’s Bonjour.
UPnP is another so called “Zero-configuration
network” similar to Apple’s Bonjour.
This tool can be used to discover all UPnP devices on your network.
UPnP comes built into many devices, especially on networked TVs, recorders and players but also on many other devices that provide access to external Apps or via web-interface.
Like Bonjour, UPnP devices are not more or less secure than other devices and the same rule applies: If you don’t need it, switch it off.
How to use
Once you press Start Scan, your network will be scanned for UPnP devices and the results will be displayed in a list.
The list is split into two sections Services and Devices. Both sections contain the same information. The difference is only how to drill down to the information.
3.26.Bluetooth
 This tool can be used to
scan for Bluetooth LE or Bluetooth smart devices.
This tool can be used to
scan for Bluetooth LE or Bluetooth smart devices.
Please note: In order to use this tool, your device needs to support Bluetooth LE which is the case for all devices from and including iPhone 4S and iPad 3.
Bluetooth LE is also often called Bluetooth smart or Bluetooth 4.0. The old Bluetooth used for connecting headphones or speakers to your device is not the same as Bluetooth LE and only shares the same name.
The old Bluetooth, still supported by Apple devices, can not be scanned and analyzed due to restrictions of the API access from Apps.
Bluetooth LE is different and even more interesting as more and more devices, even Apple’s recently announced iBeacons, use Bluetooth LE for device communications.
However, you may want to know more about which devices “talk” Bluetooth LE and may want to see more information about those devices.
For those reasons, I implemented this Bluetooth tool to NetworkToolbox.
How to use
Once you press Start scan, your environment will be scanned for “listening” Bluetooth LE devices.
All found devices will be added to the result list of the scan and further details of each device is available from here. The details depend on the device type and may be self-explanatory like the Manufacturer Name or Revision or they may be a little cryptic.
Please note: Some devices may not respond immediately so further scans might be necessary in order to find such devices. Even if a device has been found, further scans may reveal more information. Some devices may even only respond if they are activated. Some devices may need to be moved or triggered. With my recently purchased FiftyThree pen for instance, I have to press the top of the pen a few seconds. Also, a Bluetooth LE device which is already connected to another device might not be visible for further scans. For this reason, just double check the Bluetooth settings of your iPhone/iPad and disconnect a device in case it is connected and can not be found.
3.27.Port Forward
 This tool is useful for
analyzing the traffic between two network devices. It acts as a
man-in-the middle tool that connects the two devices and logs the
traffic between them.
This tool is useful for
analyzing the traffic between two network devices. It acts as a
man-in-the middle tool that connects the two devices and logs the
traffic between them.
It can, for instance, be used to see what kind of information your desktop browser or e-mail client is sending to a web server or mail server. Often, browsers transfer more information than necessary, such as your computer type, its operating system and version etc.
How to use
First, you need to enter the port to which your device should listen. This can be, for instance, Port 8080. For the destination you need to enter an IP address and port number. The port numbers can be identical or different.
Once you press Open, another screen appears and your device will start listening to the specified port on the device’s IP address.
You can then use another device or even a browser on another computer on your network to connect to this IP address and the port you have entered.
Once the browser connects to your device, you will see that a connection was established. The tool will then try to connect to the IP address and port you have entered as destination. Once that connection is also established, it will send everything that has been received from the connecting device to the destination and vice versa. All data that is being sent back and forth will be displayed. You can hide one of the following three contents parts from the list by pressing the corresponding button at the top:
- Client data – will show or hide the received data from the connected device
- Remote data – will show or hide the received data from the connected device
- Info – will show or hide information messages such as “Listening on…”
The Action button […] at the top can be used to print, copy or to send the logged information via e-mail.
3.28.MAC Database
 This tool offers a huge
database of all vendors who are entitled to assign their own MAC
addresses. For more information about MAC addresses see help text
chapter here.
This tool offers a huge
database of all vendors who are entitled to assign their own MAC
addresses. For more information about MAC addresses see help text
chapter here.
How to use
To search the database, just enter either the first three parts of any MAC address (such as e8:8d:28) or a vendor’s name such as Apple. Then press Search and you will see all matching entries.
This tool will also be used internally by other tools of this App to add vendor names for MAC addresses wherever MAC addresses will be displayed eg in the Device or Network scanning tool.
3.29.IP Calculation
 This tool performs IP
address calculations that are helpful in configuring networks.
This tool performs IP
address calculations that are helpful in configuring networks.
It also offers tools for converting between IPv4 and IPv6 addresses.
How to use
First, select the desired calculation you wish to perform from the selection at the top.
Next enter the values (IP Address, Masks etc.) for the calculation.
Please note: You can also enter IP addresses in slash notation (net/mask).
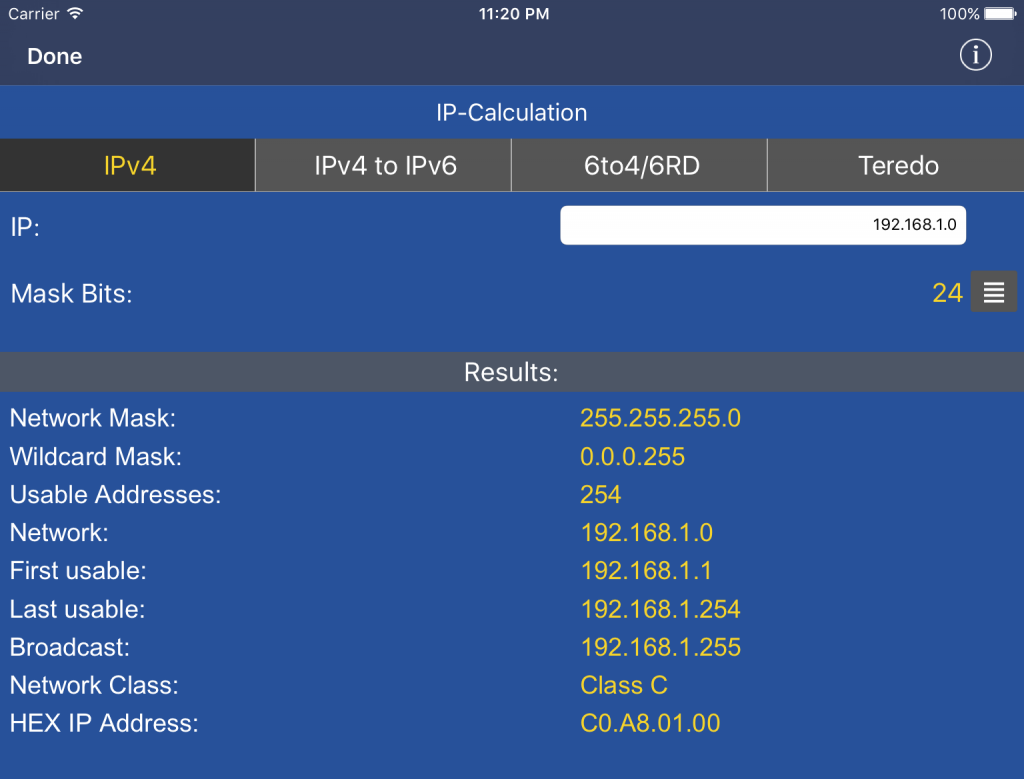
In the above case, the calculated values will be displayed at the bottom of the screen.
For the IPv6 6to4/6RD calculation, the calculation can be performed in both directions like here:
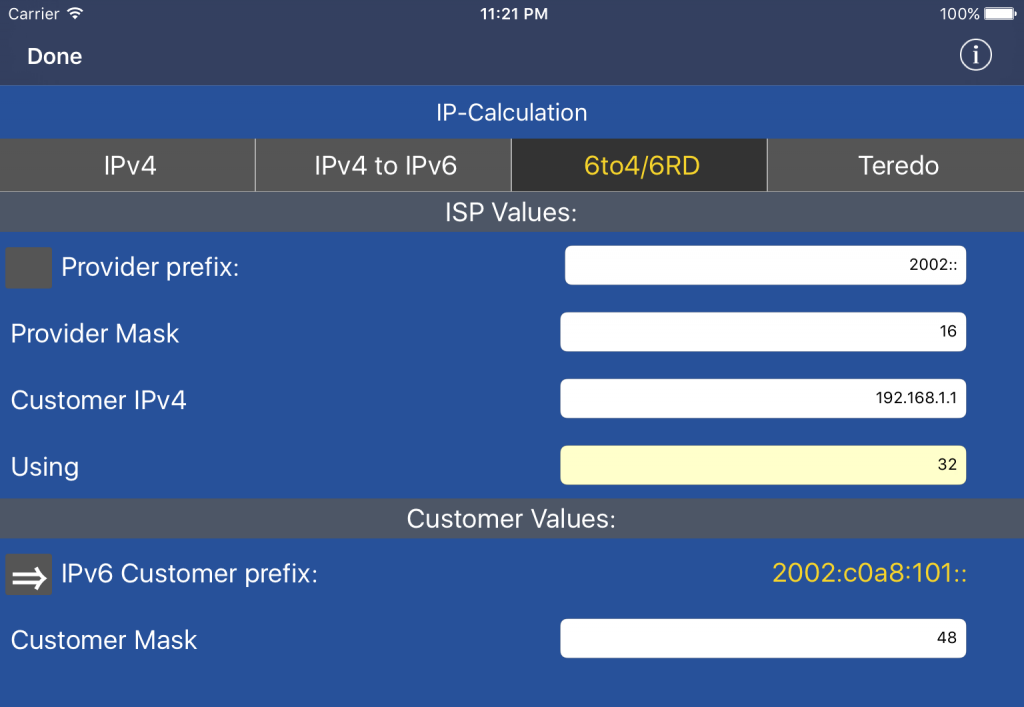
You can either convert the Provider values to Customer values or vice-versa as seen above. To switch the calculation direction just tap the Grey button in front of Provider prefix: or IPv6 Customer prefix: depending on which value should be calculated.
3.30.Local Files
 This tool allows you to access or upload
the files downloaded or uploaded using the FTP, SFTP or SMB Tools.
This tool allows you to access or upload
the files downloaded or uploaded using the FTP, SFTP or SMB Tools.
All downloaded files or files that should be uploaded will reside on a special directory only accessible by NetworkToolbox or from the Files Icon of iOS.
This local file Browser Tool can be used to access this directory.
More Information can be found in the chapter File Management of this Manual
3.31.Security Check
 This tool offers
various tests that can be used to check for certain vulnerabilities. The
number of security tests offered in this tool will grow over time as
they can be updated via data update and don’t require an App
update which may take several weeks to be released.
This tool offers
various tests that can be used to check for certain vulnerabilities. The
number of security tests offered in this tool will grow over time as
they can be updated via data update and don’t require an App
update which may take several weeks to be released.
You will find information about newly added security checks in the News section of the App and the website networktoolbox.de.
So please check the news and for data updates from time to time.
How to use
To perform a certain security check, just select the corresponding entry from the list. The information that needs to be entered in order to perform a test depends on the test itself. Mostly, you need to enter a host name or IP address and port. The port may be optional.
You will find more information about the test below the entry fields. Once you start the test by hitting the “Start” button, you will see information about the progress of the test further below. Once the test is finished, information about possible findings will be displayed.
3.32.Batch

The Batch Tool is useful if you like to perform scanning actions on multiple addresses one after the other.
How to use
You can add addresses to the batch in three different ways:
- Add addresses manually from inside the Tool by using the “Add” button
- From other Tools by hitting the Action button […] and selecting “Add to batch” which is possible for single addresses as well as complete lists
- By importing addresses from csv files as explained under “Import/Export” of this manual
Once the batch contains at least one address, you need to select which action you like to perform on this batch by hitting the menu button [=] and select one of the possible actions.
Next, hit on “Start” to perform the action on each of the addresses sequentially. Depending on the action, it may take a while until this will be finished.
For this reason, it’s a good idea to start with the “Ping” action, to see which of the addresses are responding to a network Ping. You can then remove all addresses that are not responding from the list by swiping the corresponding line to the left. Now you can run actions that take longer time only for those remaining addresses.
After actions have been performed on addresses, you will see a brief summary of the result on the right side of the address. To see more details, just tap on the address line.
3.33.Mail Server
 This Tool can be used to
check for POP3, IMAP and SMTP Mail services of a mail service.
This Tool can be used to
check for POP3, IMAP and SMTP Mail services of a mail service.
The results can either be used to find out whether your own Mail server has been configured correctly or to identify the required mail settings in your mail client for a particular external Mail server.
How to use
To check a mail server, you can either enter the domain name of the mail server or its IP address. It is not necessary to add subdomains e.g. POP3 or IMAP etc. as this tool will test for the most common names automatically.
Once the check has been started, you will see a list of available services and some recommendations at the end of the list. Entries in the list can be tapped and will provide more information with server responses so you can see which kind of password security and other options are available.
Besides providing detailed information about each mail service of a mail server, you can use this tool for identifying the (or the best) settings for your mail client.
For instance, you can see whether or not your mail provider offers IMAP in addition to POP3 and which mail server names and port settings have to be used for your mail client.
3.34.Speed Test
 This tool provides
possibilities for transmission speed measurements and is based on the iPerf standard.
This tool provides
possibilities for transmission speed measurements and is based on the iPerf standard.
Background
Some Apps are offering Speed Tests which are generating nice (and high) throughput values but often without meaning. Those Apps just send and receive data of the same content and packet size to/from a server. Such speed tests don’t say much about the real internet and provider throughput. For instance, packets are cached and don’t reflect real world situations.
There are different standards for ‘real’ network throughput tests. One of these standards is called iPerf which is implemented in NetworkToolbox.
How to use
Once this tool has been opened, you can select one of the pre-defined public iPerf Servers by using the selection ☰ or you can enter an address manually. You can also enter an IP Address or host for a local iPerf Server or even of another iOS Device running this App as Server.
Below, you can enter a Port which will be used for the connection to the server.
Please note: Even though, most iPerf server listen to port 5201, not all servers do so. Once you select a server from the list, the corresponding port for the selected server will automatically be used.
After tapping Start Test a quick, bi-directional test will be performed. As all public iPerf servers are very frequented, it may happen that you get an error message saying that the server is unavailable. In this case, either try again a few seconds later or select another server.
If the test has been finished, you can see the results on the following screen.
Advanced features
If you enable the Advanced switch at the top, you can enter additional parameters as follows:
- You can select if this App should act like an iPerf Server instead of a Client
- You can select if either an Upload or Download test should be performed. If Advanced is switched off, each of these tests (upload and download) will be performed one after the other
- You can select if a UDP test should be performed instead of a TCP test
- You can select a Block Size
Please note: A UDP Test can only be performed to a local Server and not to a public Server on the Internet. For this, you can even use another iOS device, running NetworkToolbox, let one act as Server and the other one as Client, to perform a UDP Test.
WARNING: Be careful when using this test via your Cell network. In order to produce accurate figures, the test transfers a fair amount of data back and forth which may drain your data rate.
3.35.NFC
 This tool allows to read out data from NFC devices or
NFC chips and also supports writing.
This tool allows to read out data from NFC devices or
NFC chips and also supports writing.
Background
This tool requires the availability of an NFC sensor in your device. This is the case for the iPhone 6, 6 plus, SE and all newer devices but not the iPad. There are solutions where NFC can be added to devices which are not equipped with an internal NFC sensor where this tool may also work.
This tool also requires at least iOS 11. Writing of Tags requires at least iOS 13.
Apple so far also only supports access to NFC devices following the so called NDEF standard. Other standards are supported but the API doesn’t allow to read out data from such devices. This may change in the future (at least there are rumors that it will) and once possible, I will add more standards.
How to use
After opening this tool, just tap on Read and you will see the following screen:

Then, hold your NFC device close to the NFC sensor. After a few seconds, you should see a screen like this. which contains, what could have been read out of the NFC tag:

Now, you can see the detail information and data which was read from the Tag.
To Write Tags, you can enter the Information you want to write to the Payload field. If you Tap on Write, the procedure is the same as if you want to Read data from the Tag, only that the Information (Payload) will be written to the Tag.
Payload data can be plain Text or Website Links which need to be prefixed by http:// or https:// or even phone numbers which need to be prefixed by tel: following the phone number. Once such Tags will be held again close the Device, even without having NetworkToolbox running, you will be prompted to visit the Website or even dial the given Phone number.
3.36.Glossary
 This glossary is an alphabetical list of
terms used in Network technology with definitions and explanations of
these terms.
This glossary is an alphabetical list of
terms used in Network technology with definitions and explanations of
these terms.
How to use
You can either browse and select the terms from the alphabetical list, or you can use the search function in the navigation bar to search for a specific term.
3.37.Unit Conversion
 This tool converts values between
different units, such as between Mbps (Megabits per second) and KB/s
(Kilobyte per second).
This tool converts values between
different units, such as between Mbps (Megabits per second) and KB/s
(Kilobyte per second).
How to use
Just select on of the Unit types at the top of this tool – for example Data Transfer.
Next select the Source Unit – for example megabit/second.
Then enter the Value which should be converted to another unit.
Finally select the destination unit – for example kilobit/second.
Under Result, you will find the converted value.
3.38.Base Conversion
 This tool can be used to convert between
so called base64 encoded text or Hexadecimal text.
This tool can be used to convert between
so called base64 encoded text or Hexadecimal text.
Background
Base64 encoded Text is used in various situation on the internet. Base64 is no kind of encryption but, even though it was introduced as binary-to-text conversion, will be used to hide plain text information from users. It is being used to code basic authentication headers or even Cookie contents. Once you see text with Letters and numbers and one or two ‘=’ signs at the end, likely, this is Base64 encoded text. Another coding method, even resulting in longer text, is Hexadecimal coding.
How to use
First select, which kind of code you like to encode or decode – for example Base64.
Next, enter or pase the plain text or code to the input field.
Now, tap on Encode, to encode this text or Decode to decode it.
Below, you will see the result.

3.40.Server Check

This tool can be used to check a Web-Server for leaked information or
unintentionally exposed files or content.
Background
Due to wrong configurations, bugs or security issues on the Web-Server, a Server may expose information or files that should normally not be exposed. Such information may help Hackers to break into the system or even steal confidential data.
A common issue is that Website administrators forget to protect files or directories against Website visitors.
Or the administrator doesn’t update Server software to the most recent version whereas the current version may have vulnerabilities.
Some of these issues can be revealed if a Web-Server will be accessed by using certain link parameters or by using specially crafted request-headers or request-bodies.
How to use
After starting this tool, you need to enter the Web-Server address as IP or Host (Domain) Address. Optionally you can enter a port number.
To run the check, tap on “Start”.
During the check, the Web-Server will be analyzed and the results will be displayed in a list, along with additional information and a colored flag. A red flag indicates a possible major issue. An orange/yellow flag indicates that the Web-Server may reveal some possible unnecessary information. A green flag means that noting was found or the attempt to access a file or information failed.
You can tap on each entry to see the details of the information returned by the Web-Server. From here, you can also use the action button […] for visiting the Web-Server using the corresponding parameters or perform other actions.
The internal database behind this will be constantly updated over time via Data update. It contains information from recent attacks and the Honeypots I am running.
A full check may run quite a while, depending of the Web-Server’s and your internet speed. These checks will be run sequentially and not in parallel like in some other tools. This is to prevent firewalls on the Web-Server to detect this check. However, it may still happen (or better to say it should happen) that firewalls may detect this check even though they are performed in sequence. In this case you will see consecutive server errors after a few checks were run. Then, you might want to continue the test at a later time or after changing your IP Address.
Settings
To restrict a Server Check to certain types, you can use the “Settings…” button at the top of the tool.
Here you can enable or disable certain type. You can also change the setting to “Hide irrelevant findings” which will prevent to display the green flagged results.
Please don’t forget to run the check again from time to time as new checks will be added to the database.
3.41.Dorks
 This tool can be used to find information which
was unintentionally indexed by Google.
This tool can be used to find information which
was unintentionally indexed by Google.
Background
A dork is an employee who unknowingly exposes sensitive corporate information on the Internet. The word dork is slang for a “slow-witted” or “in-ept” person.
Dork queries are advanced search operators to narrow down search engine results to find such information.
Using Google dork queries is also called “Google Hacking”
Network Toolbox has a database of common Google dork Queries which will be updated via Data update over time.
How to use
To select a certain dork query, first select the Category. Next select the dork query you like to use.
The Search string field contains the special search string for the selected dork query.
Note: You can alter this string, for instance by adding site:
to restrict the search to your own domain . Otherwise, if you use the search term as is, the whole internet will be searched.
If you tap on Analyze, the App will perform the dork query and gather all urls (links) from the search results in a list. You can then either tap on each entry of this list to visit that particular website or use the action button […] for further actions.
In case you don’t see the desired links or in case you want to see more than 50, you can also tap on Browse instead of Analyze. Then, you will see the original Search result website and can visit the links from there.
Note: If you are using Google dork queries too often within a certain time period, Google will use a captcha to ensure you are human. For this, you will also need to use the Browse button.
3.42.Pi-hole
 This tool interfaces to your Pi-hole
Server, if available.
This tool interfaces to your Pi-hole
Server, if available.
This way, you can use the App to further analyze DNS queries made on your network. This can now also be used to replace the former connections tool because it is also possible to analyze iPhone or iPad App communication.
By using this tool, you can also easily maintain your black- and whitelists.
Background
Pi-hole is an open source software which can run on a Raspberry pi to protect against Tracking, Ads or other unwanted traffic. Pi-hole even speeds up your browsing experience on your network.
Pi-hole also logs network DNS queries which helps to find Devices on your network which are performing unwanted network connections. This even helps to identify Apps on your iPhone or iPad performing unwanted network connections.
You can read more about Pi-Hole here: pi-hole.net
I have compiled a small documentation on how to setup Pi-hole on a Raspberry pi here: networktoolbox.de/pi-hole/
How to use
The tool requires an up-and-running Pi-hole server running on your network. Before using this tool, you need to enter the IP Address and API Key of your Pi-hole server under Settings.
After entering the IP Address of your Pi-hole server, hit on “Pi-hole admin page” to see if you entered the right address and your server is reachable.
Now, login to the Admin interface and you will be able to collect the required API key.
For this, select settings on the left side menu of the admin Interface and the “API/Web interface” tap at the top. Next, hit the “Show API token” button.
After confirming the warning, you will see a QR-Code and the key (or token) below the QR-code. Then, copy this token, jump back to the App and paste it to the API-Key setting of NetworkToolbox.
Finally hit on “Check API Key” to check if everything is working.
You can now use the Show Log, Whitelist, Blacklist and Visit Admin page menus of the tool.
The Show Log function is the most important part of this tool because it integrates the power and features of NetworkToolbox with your Pi-hole Server. The other functions are more or less convenience functions.
If you hit Show Log, you will see a list, similar to the Queries log function on the Pi-hole Admin interface. You can see all DNS requests and whether they were blocked (red) or not (green).
You can hit the action button […] to perform further actions on a particular domain to find out more about it, especially if you are in-doubt about the reason for the connection or wonder if it is safe to block it.
Using the “Filter” button at the top, you can limit the entries in the list to entries that are matching the filter text. For instance, if you are looking just for a certain client, just enter the IP Address or Name of the client as filter text. Or just enter a particular destination name and you will only see connections to this particular destination.
For this, you can use the Inspect tool to get more information about the address itself. Also the Certificates tool can reveal valuable additional information and is often underestimated. Or just visit the website using the HTTP tool or Safari.
Once you have done that, you can tap on the line itself to see the detail screen of the entry. From here, you can Blacklist (or Whitelist) this particular address.
Giving the connections App back
Those of you, using my App for a longer time, will remember the connections tool. This was a quite useful tool to identify Apps that are calling home or performing other, unwanted connections. That tool was gone after Apple removed the necessary API in iOS 10.
Now, with the Pi-hole tool and a Pi-hole Server you can get back that functionality (and even gain more security and speed).
If you want to see what traffic a certain App is generating, first open the Show Log menu and hit refresh. Now, wait some seconds and hit refresh again. Remember the top entry you are seeing, Then, start the App you like to inspect, let it run and go back to Show Log screen of the Pi-hole tool and hit refresh again.
Now, have a look to all entries that are for the IP Address of your iPhone and iPad.
Some entries might have come from something that happened in between switching to the other App and back so you may want to repeat this to see if the connections were indeed caused by the App.
You can then, conveniently block (blacklist) requests made by the App and see if the App is still running well.
On an iPad, you can even use Split-Screen multitasking to have NetworkToolbox and the other App side by side to see which connections are generated while using the App.
3.43.Two Tone
 This tool generates Two-Tone audio
sequences or other coded tone signals.
This tool generates Two-Tone audio
sequences or other coded tone signals.
Background
Audio signals can be used to encode information. There are various standards and ways to encode data into audio. The most common is DTMF (Dual tone multi frequency) encoding where two different audio frequencies are used to encode numbers and letters (from A to D) and the two signs # and *. This coding is being used to encode phone number dialing. There are other coding standards used by pagers or radio systems.
How to use
First, select the desired coding standard at the top under Type.
Next, you can select a single Character or Code which should be generated.
Depending on the Coding standard selection, you will see more background information about the standard and (where available) exact frequencies being used for the code.
Tap on “Generate” to generate the desired code.
For some codes (like CTCSS) you can enter multiple characters to get generated. In this case, you can enter the code sequence in the separate Codes field. Next, tap on “Generate sequence” to generate the code sequence.
3.44.Have I Been Pwned
 This tool provides information if whether
or not an Email address has been compromised in a data breach.
This tool provides information if whether
or not an Email address has been compromised in a data breach.
Background
Background: This tool used to use an API offered by Troy Hunt. He created the “Have I Been Pwned” service as a free resource for anyone to assess if they may have been put at risk due to an online account of theirs having been compromised or “Pwned” in a data breach. For this, he is collecting all available information about data breaches of the past. Have I Been Pwned is also available on his website haveibeenpwned.com
Unfortunately, there were several users who misused this API so Troy had to remove free and public access to the API.
But good news: I decided to pay the monthly fee for it so you can use it for free from inside my App (starting with Version 3.7).
So please continue to use this tool to check your Email addresses and in case your Email address has been ‘Pwned’ you should change password on every service you are using with that Email address. Also, most likely, you will receive Spam mails but there is not much you can do against this other than switching to another mail address.
3.45.Blacklist
 This tool allows to search several
blacklisting services for a domain or IP Address.
This tool allows to search several
blacklisting services for a domain or IP Address.
Background
There are services on the web which are collecting information about Spam mails and their origin.
The most popular and effective Blacklist service is the Spamhaus Project founded by Steve Linford. Spamhaus got some popularity some years ago when they got attacked by a (so far) never been seen before DDOS (Distributes Denial of Service) attack caused by one of the Spammers they listed in their database as an act of revenge. This incident revealed how powerful such Blacklists are today against Spammers.
Nowadays, there are several additional Blacklist services with different focus, quality and reliability.
The two challenges of those Blacklist services are to prevent false alarms (which may result in blocked domain ranges) and late alarms (which may cause domains to send out Spam for some time before they bet blocked).
For this reason, it is good practice to rely on more than one Blacklist.
This tool allows you to query several Blacklists for a certain IP Address or Domain.
The list of included Blacklist servers will be updated via Data-Update from time to time.
This tool is useful, if you want to check the originator of a Mail. For this, you need to have a look to the source code of a Mail (which usually is an option of most Email Clients) and look for the originating IP Address and domain of the mail.
It is also useful to search the Blacklist for other suspicious IP addresses or domains to see if the server of an Address might have been compromised and now used to distribute Spam. In this case, the Address might be listed on a Blacklist.
3.46.Elasticsearch
 This tool can be used to browse so called
Elasticsearch databases.
This tool can be used to browse so called
Elasticsearch databases.
Background
Elasticsearch is a popular Search database or better to say engine. It is popular because it’s easy to use and very flexible because there is no need for a database schema as like for other databases.
On the other hand, Elasticsearch has a bad reputation because often, administrators forgot to protect access to it and several data beaches in the past were caused by un- or not-well protected Elasticsearch engines which can easily be revealed by Shodan or Morpheus.
In 2019 for instance, Conrad Electronic acidentally exposed 14 million customer records including financial data and addresses.
This tool allows to browse through data stored in Elasticsearch databases.
How to use
After opening this tool, you need to enter the Address (domain or IP Address) of the database server. This is the only mandatory field. Other fields are optional.
The port is usually 9200 and the so called App name is the root path of the database on the server which is often ‘elasticsearch’.
If you leave these fields blank, this tool will try for the most common values. Knowing and entering those values will speed up opening the database.
In case the Elasticsearch server is protected, you can enter the username and password pair below.
Tap on Start to start browsing the server. If the Elasticsearch database is accessible, you can drill down the data step by step from here.
3.47.Packet
![]() This tool can be used to monitor or
generate network traffic (Packets).
This tool can be used to monitor or
generate network traffic (Packets).
Background
Sometimes you may want to see the data packets, sent from a server or generate your own packets and submit them to a client. This is what this Tool is for.
This Packet tool can send packets either using UDP or TCP to a given IP Address and port. And it can listen on a certain port for packets in UDP or TCP.
There are many use cases for such a Tool. If you have two iOS devices, you can use one for sending, the other for receiving and can check if data on a certain port will pass through, even from inside your network or outside to inside, or you can send wrongly formatted or too large packets to see if a server still behaves correct after receiving such packets.
The definitions for TCP and UDP are explained in the Glossary of this App but in short, you can see both protocols as a standard to transfer data between two network services. The difference is, that TCP requires an established connection for the transmission whereas UDP does not. So TCP is more robust and you always know whether or not the data has been transferred which is not the case for UDP. However, TCP has more data overhead and is slower than UDP. TCP is being used for website traffic wheras UDP is being used for Audio and Video traffic where lost packets are not that important.
How to use
After opening this tool, you will see a screen like this In the upper part “Transmit:” you
can enter the destination address, port number and select the protocol
(UDP or TCP). Below you can enter the data which should be sent (in this
case the text “test”) which is repeated 1 time. If you tap on HEX the
text will be converted to hexadecimal digits and you can continue to
enter more hexadecimal digits.
In the upper part “Transmit:” you
can enter the destination address, port number and select the protocol
(UDP or TCP). Below you can enter the data which should be sent (in this
case the text “test”) which is repeated 1 time. If you tap on HEX the
text will be converted to hexadecimal digits and you can continue to
enter more hexadecimal digits.
(Note: if you want to send a packet of 256 bytes of zeros, you can enter 00 in Hexadecimal and 256 for Repeat)
If you tap on Send, that data will be sent immediately and further below, at the bottom, you will see the result which might be an error if you have selected TCP and if on the given IP Address and port, no server is waiting and accepting the data.
In the “Receive:” section of this Tool, for your convenience, you will see the IP Address of your device (which is where this Tool is listening for the data). Below, you can enter the Port where to listen and you can select again if you like to use the UDP or TCP protocol. Once you tap on “Start Listen” the Tool will start a Server process that is listening on the given port and protocol.
In the example above, the same IP Address, port and protocol for sending and receiving was used so once a packet was sent, it will be received and displayed in list at the bottom (in opposite order, newest first).
3.48.OTP
 This Tool generates one-time passwords
(OTP).
This Tool generates one-time passwords
(OTP).
Background
A one-time password is an automatically generated numeric or alphanumeric string of characters that authenticates a user for a single transaction or login session.
An OTP is more secure than a static password, especially a user-created password, which can be weak and/or reused across multiple accounts.
For security reasons, you should use hardware OTP generators as they are
not as easy to compromise comparted to software solutions.
This Tool is not meant for maintaining multiple OTPs but to verify a
certain Secret and it’s OTP.
OTP generation is standardized in RFC 4226 and RFC 6238, however there are different variants available. There are different Algorithms, number of digits and the so called “Factor”.
Using a Timing Factor means that the OTP will change after the time factor expires. A counter factor will change the OTP with every new count. Usually, the counter will be increased with every OTP generation.
The most common variant uses SHA1 as Algorithm (even though SHA1 can be seen as insecure) and six digits using a Timing factor of 30 Seconds.
How to use
To generate a OTP, paste or enter your secret to the secret field. Next chose the Algorithm, number of Digits and Factor in case you like to use different variants.
Next, use the Generate button to generate an OTP which will be displayed in the list below along with the valid time range or counter value.
You can use this Tool to check if the OTP service you plan to use supports different Algorithms or if you want to double-check which Algorithm is used by another OTP generator.
3.49.VirusTotal
![]() This tool can be used to check Files,
Websites, Domains and IP Addresses for malicious content or activities.
This tool can be used to check Files,
Websites, Domains and IP Addresses for malicious content or activities.
Background
This tool uses the API offered by VirusTotal . VirusTotal is a community driven service which offers scanning of contents using over 70 different scanners.
How to use
Once you open this tool, you can select a Scan type (File, URL, Domain or IP-Address) and use the Add button to add an item to the list.
You can also add items to the list from other Tools by using the […] action button.
Once you have items added to the list, you can tap on the item to check for available information for this item on VirusTotal.
Files and URLs
For files and URLs, you may see some results, even if you have not yet submitted the File or URL to virus total because Network Toolbox uses the fingerprint of the file or URL to see if somebody else might have already sent the same file or website URL to VirusTotal. If that’s the case, you will see the results immediate. If the File or Website has not yet been scanned, you have to use the “Send File” or “Send URL” button to submit it to VirusTotal for scanning. After that, it may take a few minutes until you will be able to see the results using the “Re-Check” button. These results will be updated over time so you may want to use the “Re-check” button to get updated results.
Domains and IP Addresses
For this type, it is not necessary to submit some data to VirusTotal upfront and you will immediately see the VirusTotal analysis results.
PLEASE NOTE: In order to use this tool, you need to obtain an API key from VirusTotal. You can get such an API key for free on the VirusTotal website. Once you have an API key, you can enter it in the App Settings under VirusTotal.
4.Tool Maintenance
A few Icons are actually not Tools by themselves. Instead they offer Maintenance for other Tools.
These Tools use a different (green) color to be differentiated from the other Tools.
4.1.Passwords
 Passwords that have been
discovered by tools such as the http or telnet tools can be collected as
custom passwords for future reference and re-use.
Passwords that have been
discovered by tools such as the http or telnet tools can be collected as
custom passwords for future reference and re-use.
To collect a password in those tools, you can use the “Add custom password” function from the action button […] which will be available once you entered or selected a password.
Those passwords can be maintained in this tool of the App.
But you can also add your own pre-defined or commonly used username/password combinations here.
If you want to add your own custom passwords, just press the “Add” button at the top of the screen.
To maintain a password, just tap the entry you want to modify. In addition to the automatically added fields like Title, Host, Username and Password, you can also add a comment.
To use these custom passwords from within the tools, you can select “Custom list” instead of “Default list” when using the “Login” function for example of the HTTP tool.
4.2.PKI
 Similar to, but more secure than,
passwords, Public and Private Key combinations can be used for SSH
connections as in the SSH or SFTP Tool.
Similar to, but more secure than,
passwords, Public and Private Key combinations can be used for SSH
connections as in the SSH or SFTP Tool.
Just as in the Passwords tool, you can maintain and even generate new Public and Private keys here inside this tool.
All Public/Private keys entered here in this tool can be used from inside the SSH and SFTP Tool.
To add an existing Public/Private key combination, just tap on “Empty” under the “Create new” heading. To generate a new key, please see further below under Generate your own keys
You will then see the key entry screen.
In the top line of the key entry screen you can maintain an individual name for the key combination.
The public key needs to be entered (or pasted) to the top big entry field. The private key can be entered or pasted in the lower field. You can use either OpenSSH or Putty keys but please note: For Putty keys, Public and Private keys are combined together and needs to be entered or pasted in the private Key entry field. The upper Public Key entry field needs to be left empty in case of Putty keys.
Public keys are always unencrypted. Private keys can also be unencrypted but it is recommended to always store private keys encrypted. For the encryption, a password (sometimes called passphrase) will be needed. For that reason, I recommend you take advantage of the optional use of a password for the private key – see later.
To check whether the entered keys are valid and in order to obtain the Key Fingerprint, just hit the Validate button at the bottom. If you are using an encrypted private key, you will be asked for the password before you will see the validation results.
Generating your own keys
To generate a new key combination, just hit one of the other buttons below the “Create new” heading, depending on the type of key you want to generate.
Once you hit any of these buttons, you will be asked for a title, the key size and encryption type (RSA or DSA) and an optional password. If you leave the password blank, the Private key will not be encrypted.
When done, just hit the right check button at the top and a new key will be generated. This may take some time on slower devices especially if bigger key sizes are being used.
You can then find the newly generated key entry in the list. By tapping on that entry, you can edit, copy and validate this information.
Under Resources, Tutorials and Public/Private key Tutorial you will find a tutorial which explains how to use keys generated by NetworkToolbox to secure a linux login.
4.3.Devices
 Depending on your
Network, some or all devices may not publish their network names so they
might be hard to identify.
Depending on your
Network, some or all devices may not publish their network names so they
might be hard to identify.
For this reason, NetworkToolbox offers the possibility to assign your own names for your devices. Once you assign such a custom name, this name will be displayed instead of the network name along with the device.
You can enter Custom names in three different ways.
- After scanning, you can tap on the details of scan results where local devices are displayed and just enter the name of that particular device.
- After scanning, you can export a complete scan list to the list of custom device names by hitting the […] button at the top and select “Add to Custom Devices”.
- You can add (or edit) entries manually from here by just hitting the Add button or tap on the entry in the list you want to edit.
PLEASE NOTE: The best and most reliable way to assign custom names to devices is to assign names based on MAC addresses because MAC addresses are unique. Since iOS 11 no longer provides MAC Addresses, this tool offers the possibility to either use a MAC Address or an IP Address for assigning custom names. However to use IP Addresses makes only sense for devices where the IP Address remain the same. This can be achieved by either instructing the router to always assign the same IP Address to a device or by using a fixed IP Address for the device configuration.
4.4.Macros
 This Tool allows
you to maintain text that can be sent from inside the Telnet (Socket)
and SSH Tools.
This Tool allows
you to maintain text that can be sent from inside the Telnet (Socket)
and SSH Tools.
This is useful, if you often have to send one and the same command or long text to a server.
A Macro can contain plain Text, special Characters or commands e.g. to call another Macro. For details see Macros.
How to use
On the main screen, press “Add” to add a new Macro.
On the following screen you have to Name the Macro first.
In the field below, you can type the text which should be sent to the server when this Macro has been started.
For details about special Characters and Commands that can be used in a Macro, see here.
5.Logbook
This section of NetworkToolbox can be used to store all type of scanning results for later use. You can even compare two different Network Scans.
To add content to the Logbook, just tap the […] button in the different sections of the App either to add a single entry such as a host or IP Address to the Logbook or complete lists such as Port or Network scanning results.
Whenever an entry is to be added to the Logbook, you will be asked for a keyword. This could either be left blank or you can enter a term that will help you to identify the results later in the logbook or collect multiple results using one and the same keyword. Once you have entered a keyword, the same keyword will be pre-entered in further cases so you don’t have to remember and re-type the keywords you entered before.
On the Logbook screen all entries can be found either under “All” or by selecting the entries further below by the type of scan from where you added the logbook entries.
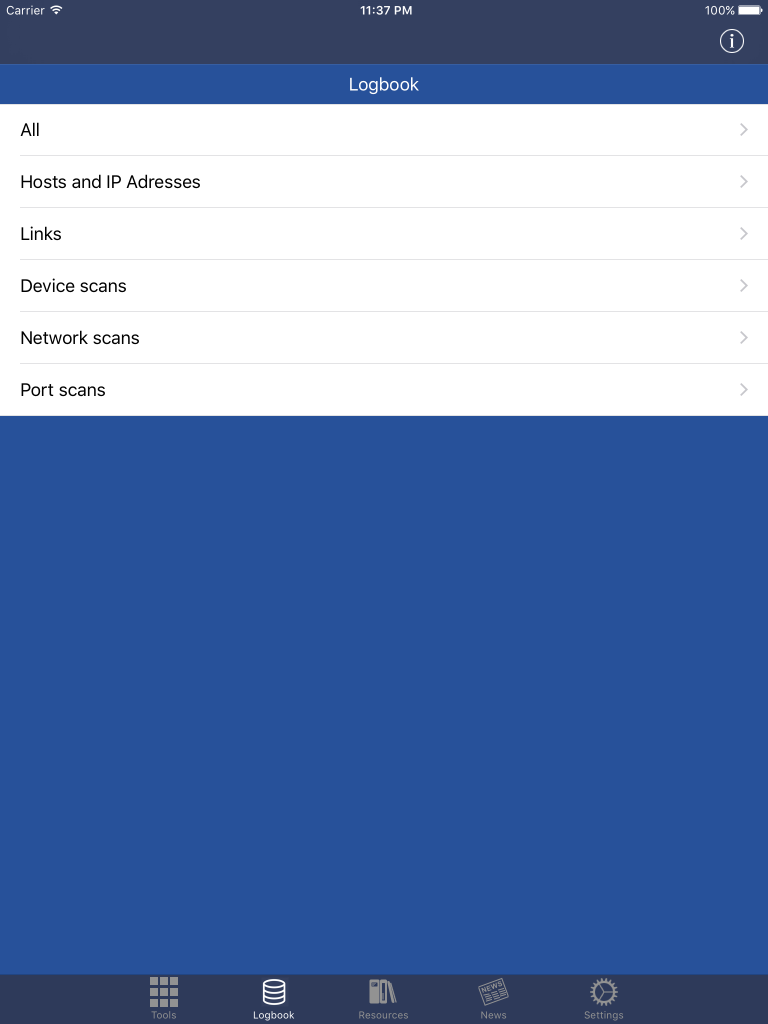
The Logbook entries
Once you have selected a Logbook type, all entries are grouped by the keyword you entered as described before.
In the entry list, you can just tap on the entry to see the contents.
Entries can be deleted by swiping left. You can also change the keyword by tapping the (i) button.
Once you tap on an entry in the Logbook, you will see the details (e.g. list of scanning results) in the same way as they appear under the “recent” entry in each individual scanning tool. So you can further analyze the findings from here.
You can also remove individual entries from this list by left swiping.
Network Scans can also be compared. This is useful if you perform Network Scans at different times and want to see which devices have been added, removed or changed. For this, just tap the […] button at the top of the Network Scan list in the Logbook and select “Compare two logs”. After confirming the explanation, just tap the two entries you wish to compare one after the other.
6.News
This News section is used to keep you updated with news about this App, such as new update announcements as well as new tips and tricks.
How to use
Please feel free to send me your own tips you want me to share with other users in this section. Just use the Support function in the settings section for this.
This section updates automatically if you set to check for updates automatically in the Settings section.
News identification
New posts are labeled with a red ‘New’ badge. Once a news item read, the
badge disappears.
Some posts will be labeled with a green ‘Announcement’ badge –
indicating messages of higher importance. Once a news item read, the
badge disappears.
Deleting individual posts
News posts can be deleted by swiping your finger across the News post from left to right.
Bulk actions on News posts
From the main News screen under the Action icon […] (top of the screen) you can perform the following actions: Mark all read, Mark all unread, Delete all, Undelete all
Please use the News Preferences function to customize the type of News posts you would like to receive.
When you have opened an individual News item, you can interact with it by tapping the Action button […] at the top of the News item screen:
- E-mail it to a colleague or a friend
- Print over Wi-Fi
- Share on Social Media or via Text message
8.Settings
This section of the App can be used to customize the layout and functionality of NetworkToolbox.
Most of the settings are self-explanatory and I would suggest that you play around and change some of the settings to get used to them. In case you get lost or change settings that prevent the App for working as expected, just use the “Reset to defaults” function from the […] action button.
8.1.Organizer
The organizer can be used to arrange the App tool icons on the main screen. Just drag and drop the = button on the right side of the screen to move tools up and down or even disable tools by deselecting the check mark on the left side of each tool.
8.2.External Apps
Your favorite Apps can be integrated into NetworkToolbox using this list to maintain external Apps.
External Apps will be made available as an additional option when using the […] action button for further analyzing or connecting to a destination.
Just press (+) to add a new external App.
The Title and Comment fields are optional but will help to identify or maintain the entry later.
The default port is optional and can be left blank if desired. However, if you enter a port number, the external App will automatically be selected when you use the […] button on an address with that port number.
The URL Scheme entry is most important and responsible for starting the right external App.
The URL Scheme is basically like a standard WEB URL with a specific prefix other than http://. The prefix depends on the App you want to start. For instance, some popular VNC remote access client Apps support the prefix vnc://.
In order to transfer the selected address to the external Apps, you can use macros in the URL Scheme as follows:
- $address – for the IP address or host
- $port – for the port number (if available)
- $username – for the username (if available)
- $password – for the password (if available)
So, a URL Scheme for an external VNC client could look like
vnc://$address
For testing, you can add the following:
Title: test
Default port: 80
URL Scheme: http://$address:$port
Enabled: 1
Now, if you tap […] on an IP address or host, you will no longer only see the included options (Copy, Domain infos…) but also an entry called Test which will open Safari as an external App on your device, as http:// is the URL Scheme prefix of Safari.
8.3.Shodan Settings
Shodan offers a free and paid service. I am paying for Shodan so that you can use this App with Shodan. However, the credits that can be used by the App are limited.
If you use Shodan more often, want to get more results or even if you want to support Shodan’s great service, I recommend to register for your own API key.
Once you have received your API key, you can select “Use own API key” in the Shodan Settings of this App and enter or paste the key in the field below.
The “Check API Key” can be used to find out the status of the key.
The “Use old Shodan API” switch at the top of the Shodan settings can be used if you experience issues with Shodan.
9.Background Information
9.1.IP Addresses and Ports
Generally speaking, an IP address can be seen as the street addresses of a house, whereas a port, on the other hand, can be seen as the door inside a house leading to an individual room.
IP Addresses
TCP (Transmission Control Protocol) and UDP (User Datagram Protocol) are two of the protocols that make up the TCP/IP protocol suite which is used universally to communicate on the Internet.
Each TCP/IP device (Computer, Router, Printer etc.) on a network has at least (but usually only) one IP (Internet Protocol) address. An IP address is a numerical label assigned to each device and serves two principal functions: host or network interface identification and location addressing.
The designers of the Internet Protocol defined an IP address as a 32-bit number and this system, known as Internet Protocol Version 4 (IPv4), is still in use today. A new version of IP (IPv6), using 128 bits for the address, was developed in 1995.
The 32-bit binary number is usually represented in groups of four numbers each between 0 and 255 and separated by a dot such as 172.12.214.2. Each number represents 8 bits of the total 32-bit number.
Ports
Each IP address theoretically has TCP ports numbered from zero to 65535.
Each port represents a service or function on a network device and can be used to communicate to the device based on the protocol that is defined by the port.
The first 1024 ports are called the Well-Known Ports and are associated with standard services such as FTP (file transfer protocol), HTTP (for websites), SMTP (e-mail), DNS and so forth. Some of the addresses over 1023 also have commonly associated services, but the majority of these ports are not associated with any service and are available for a program or application to use to communicate on.
A network device can run multiple services at the same time but each service needs to use a different port. For instance, a server can run a web-server service on Port 80 to show websites and it can also offer a mail-server on Ports 110 (POP3), and 25 (SMTP) for instance. If one connects to the IP address at Port 80, the server will respond with a HTTP header; on the other hand, when connected to Port 110, the server will respond with the standard response for a POP3 mail server.
9.2.MAC Adresses
A MAC address (Media Access Control address) is a unique identifier assigned to network interfaces (Network card) for communications on the physical network segment. MAC addresses are mostly assigned by the manufacturer of a network interface controller (NIC) and are stored in its hardware. A network node may have multiple Network cards (NICs) and each must have one unique MAC address per NIC.
A MAC address is usually represented by six hexadecimal numbers separated by a colon like f0:d1:a8:08:21:07 for instance.
This App offers a huge database with all vendors who are entitled to generate their own MAC addresses. The aforementioned MAC address for instance has been assigned by Apple.
9.3.Network Scanning
Network scanning is a procedure for identifying active hosts on a network, either for the purpose of attacking them or for network security assessment. Scanning procedures, such as ping, sweeps and port scans, return information about which IP addresses map to live hosts that are active on the network.
(To learn more about IP addresses, have a look at the the chapter IP Addresses and Ports of this Manual)
Scanning is one of three components of intelligence gathering for an attacker. In the foot-printing phase, the attacker creates a profile of the target organization, with information such as its domain name system (DNS) and e-mail servers, and its IP address range. Most of this information can be collected by this App.
As a result of a network scan, you will receive a list of IP addresses, along with the MAC addresses and network names for each of the IP addresses.
(More information about MAC addresses can be found in this Chapter)
The next step is usually a port scan on each individual IP address.
(More information about port scanning can be found in this Chapter)
9.4.Port Scanning
Port Scanning is the name for the technique used to identify Open ports and services available on a network host, either for the purpose of attacking them or for network security assessment.
You can run a port scan to audit your network for Vulnerabilities; however, it is also used by hackers to target victims. It can be used to send requests to connect to the targeted computers, and then keep track of the ports which appear to be open, or those that respond to the request.
(to learn more about ports, have a look at the chapter IP Addresses and Ports of the help text)
Open ports as such are not dangerous and do not mean a network is insecure. Some ports simply have to be open in order to allow communication between devices. However, ports should not be open unless they really need to be.
It is also important to differentiate between ports that need to stay open for internal communications (within your network) and those that need to stay open to allow communications with an external network or, in other words, with anybody on the Internet.
Once you discover which ports are open, by port scanning your network using this App, you can then determine whether it is necessary for those ports to be open. And, if so, whether they need to be open to the internal network, the external network or to both. If, however, they do not need to be open, that is, no service on the internal network or the external one needs access to those ports, then you should close them. On the other hand, if they do need to be open, especially to the external network, you can then begin to research what sorts of vulnerabilities and exploits your network is open to by having these ports accessible and then apply the appropriate patches, updates or mitigation to protect your network as much as possible.
Ports that need to stay open to communicate only within your internal network, and not to the external one, should to be protected by a firewall, which, as the name suggests, puts a “wall” between those open ports and all other networks. Home network routers that are used to connect the internal network to the Internet usually have a basic firewall functionality included. They offer at least a functionality called NAT (Network Address Translation). This is the easiest way to protect your internal network from the outside. With NAT, your internal network has a different IP address range to the address of the external, Internet connection. Internal IP addresses often have the range of 192.168.x.x., and are usually fixed, whereas the IP address used to connect your router to the Internet, called the Public-IP address, may well change from one day to another. The Device tool in this App will display both addresses.
NAT allows data packets from one network to pass to another. So, for example, in order to browse the Internet, NAT is configured to pass all internal data from Port 80 to the public IP address on the same port and vice versa.
If the router were configured to only handle data on Port 80, all other open ports in your internal network would not be accessible (ie would be blocked) from the outside and you would be safe in that respect, but life is never that simple. You sometimes want to use your internal network’s services or resources (such as a web camera or hard drive) over the Internet as well as over your internal network. The relevant ports would need to be open to the internal network, but you could not have those same ports simultaneously open to the external network. The reason for this is simple: you cannot have two sets of communications passing through the same port at the same time. A port can only be used for one service at any one time, otherwise it would be like trying to listen to two people talking to you at the same time; confusion would result and a network error would be triggered. So you would need to configure the router so that an external connection to the device is assigned a different port to that used for internal communication.
An example would be a web camera. You can usually watch the camera internally by simply entering its IP address in your browser’s address bar, because the camera is communicating via Port 80 (HTTP). Now, if you also want your web camera to be accessible externally, your router would need to be configured so that incoming connections to the camera arrive at the router, let’s say, at Port 8080 and are then passed to Port 80 at the internal IP address of your camera. Your camera would then be accessible externally by entering its public IP address in a browser (on an external network) and adding :8080 to the URL, meaning that the external connection to the router will be established on Port 8080. Then, due to the way you configured your router, that connection would be routed internally to Port 80 at your web cam.
So if you do a port scan, you will need to keep this in mind.
9.5.Device search with Shodan or Morpheus
The main use for Shodan or Morpheus is to search for network devices of a specific type, name or even location. With Shodan or Morpheus it is possible for instance to search for TV-Set-Top-Boxes such as the Dreambox, Web-Cameras or any other device that is connected to the Internet. Most such devices will answer with a specific response when connected to. This response may even contain the name of the device or something that is unique to the device, and this is the basis of how Shodan or Morpheus work. They simply collect and store the responses in a searchable database.
The HTTP-Head tool of NetworkToolbox allows you to analyze such information from an individual device.
Morpheus is an alternative to Shodan. Like Shodan, it is a device search engine and can be used to search for certain Servers, Routers, Set-Top Boxes and other devices on the net. Morpheus works best when using Ports 80, 21 and 443, whereas Shodan searches for additional ports. Morpheus also has newer entries and only keeps old entries if they continue to be accessible. Both engines use different approaches to crawl the Internet for devices.
So both search engines have their own pros and cons and it’s probably good to try both engines when searching for a particular device.
Please keep in mind, Morpheus is currently in Beta testing and might be offline or slow at times.
9.6.Password Test
Password tests are offered in the HTTP, FTP, SFTP, SSH and Telnet tools.
A password test lets you test the server for certain commonly used username and password combinations. When this function is started, you will see a list of username/password combinations.
Alternatively, you can switch to your own customized username/password combination.
You can toggle between predefined and your custom list by pressing the corresponding tab at the top of the list. Please read further below about how to maintain custom passwords.
Once you select an entry in the list, it will be checked to see if that username/password combination opens the server (web-site or ftp/sftp account). If this fails, the list will be displayed again but the last username/password combination tried will be struck through so you can easily see which combinations have not yet been tried. Alternatively, you can manually enter a username/password combination.
It may well happen that you are able only to try one or two username/password combination and no more. This can happen if the server’s security features disconnect you after a couple of failed login attempts. In this case, you will need to go back and open the connection again. However, the tool still remembers the username/password combinations you have already tried. It may also happen that the website times out before you manage to select a username-password combination and you get an error message. This is also due to tight security settings, and you would need either to be quick or else to enter username/password into the main screen of this tool.
The provided list of username/password combinations will be updated from time to time to contain the most commonly used combinations or even to exploit backdoors built in by the manufacturer. It is well known, for example, that HP have built backdoors to their devices. It is highly advisable that you test your own devices, such as routers and web-servers, to see if one of those combinations will let you in. In that case, you should quickly close this security failure by changing those credentials on your device and installing any updates. Also, as mentioned before, you can also try to change the settings so that only one failed login attempt is possible or that the connection times out quickly.
It is usually safe to perform this test on your own equipment unless you have intrusion-detection systems in place which assume this kind of test is an attack and then proceeds to block connections from your iPhone or iPad either permanently or otherwise.
Custom passwords
Custom passwords can either be maintained manually or collected from inside the individual tools.
To maintain the custom password list manually, just open the Passwords Tool. Here, username/password combinations can be added manually by hitting “Add” button. Along with username and password, you can also enter a Title, host and comment. These fields are optional. However, if a hostname (domain or IP address) is entered, the corresponding entry will be highlighted in the password selection list once you are connected to that particular server.
Besides manually maintaining a username/password combination, it is also possible to create a new entry with discovered username/password combinations. For this, you can use the HTTP, FTP, SFTP or Telnet tools as usual and can either login to the server manually or by using the default password list. Once you are logged in, you can press the action button […] and select “Add Username/Password to Custom Password list”. This will create a new entry with even the Title and Host field filled out.
9.7.Directory traversal tests
A directory-traversal exploit is an exploit where a website is accessed with additional parameters that cause the web-server to malfunction and/or reveal hidden information and file contents.
A classic example is to add parameters such as /../../../../../passwd at
the end of a website url which may display the contents of the password
file of the server. There are many different traversal exploits for
Windows systems or embedded devices.
Once started, the traversal test will show a list of common and known
traversal exploits, just like the password test. You can test one
exploit after the other by just selecting a corresponding entry in the
list. Ideally, you will get an error message or the website will be
displayed as before.
You can try one entry after the other. All previously tested entries will be struck through.
If one of these exploits results in a server malfunction or even reveals security information, you most likely will have to install updates for that device. If no updates are available, it is highly recommended that you replace that particular insecure device.
It is usually safe to perform this test on your own equipment unless you have intrusion-detection systems in place that assume this kind of test is an attack and then proceed to block connections from your iPhone or iPad either permanently or otherwise.
9.8.Browser Agents
Modern websites display different content depending on the browser type. This is especially interesting for mobile websites. Normally, with Safari on your iPhone or iPad device, you will only see mobile websites that reduce the amount of content so they display well on mobile devices. Unfortunately, most websites see an iPad as a mobile device and show their content in the same way as they would for an iPhone. With the HTTP tool, you can select different Agents. For instance an Agent for a desktop computer such as Firefox will show how the website would look on a desktop computer. You can also select Blackberry and see how the website would look on a Blackberry device (of course only if the website provides different content for Blackberry devices).
9.9.File management
In order to upload and download files, the “FTP”, “SFTP” and “Local Files” Tool can be used.
All files that are being downloaded from inside the FTP or SFTP tools will be downloaded to a local storage location inside this App. This local storage area can be accessed from the “Local files” Tool or from the iOS Files App (see details in the next Import/Export chapter).
So if you want to download a file from an FTP or SFTP server, just connect to the server with one of these tools. After downloading the file, you can open the Local files tool and see the downloaded file. From there, you can alter the file or even alter directories in your local storage location and process the file further by using the following functions in the command bar:
- .. – to change one directory up
- / – to change to the root directory
- CD – to change to a specific directory (the name will be asked after pressing)
- MD – to create a new directory
- RD – to remove a directory
- DEL – to delete a file
- REN – to rename a file
- View – to view a file
- Open – to open the file with any other App installed on your device
- E-Mail – to send the file via e-mail
(Please note, the command bar can be scrolled horizontally if the buttons won’t fit on the screen)
9.10.Import/Export
Some Tools can Export results to a CSV file. For this, just tap on the Action button […] and select “Export”. You will then be asked for a Filename. The file will be stored on the local files folder on your device.
To access this export file, you can either use the “Local Files” Tool of Network Toolbox. From here you can send that file via Email or open and edit it in other programs on your device like the Numbers App – if installed.
Another and more flexible possibility is to use the “Files” App of iOS. After opening the Files App, you will find all export files under “On My Device” …

and the “NET-Toolbox” Icon:

From here, you can copy or move the file to other File Providers like Next Cloud (if installed) or iCloud Drive to share the file with other devices including a Mac or PC where you can open and edit this file with your favorite desktop Software.
In the same way, you can copy edited files back to the
“NET-Toolbox” Folder under “On My Device” and
import the File from within Network Toolbox using the Action button
[…] and “Import”.
Importing files back is
possible for “Devices”,
“Passwords” and the
“Batch” Tool.
This way, you can easier create or edit large lists on a Desktop Computer using a physical keyboard (e.g. to add MAC Addresses or Custom names for IP Addresses, add your own common passwords you like to use and test etc.)
The File Format of these export files can be adjusted on the Settings screen under “Export”. Here you can alter the Delimiter which is used to separate fields or weather the first line includes a header with field names or if CR/LF (0x0d,0x0a) is used at the end of each line or just CR (0x0d).
Also, you can enter the extension for the export file.
For older Excel versions you may want to use the extension tsv and a Tab as delimiter.
For a tab delimiter you can either enter t or {TAB} in the delimiter field
9.11.MACROS
Macros can not only contain plain Text. They can also contain control characters or commands.
Control Characters
Control Characters start with a ^ followed by a Capital letter (e.g. ^A) which sends the corresponding Code to the Server. The Code is equivalent to the Code generated by pressing the Control Key along with the Letter on a regular Keyboard. ^M for instance is Carriage Return.
Such special Keys can also be sent by naming the Key surrounded by { and }. For instance {CR} will also send a Carriage Return and {BS} will send a backspace.
Further below is an ASCII Table containing all key names.
Macro commands
In addition, the following commands can be used in a Macro:
{SLEEP:n} – The Macro will wait for n seconds
{CALL:macro} – Another Macro with the Name macro will be called
ASCII Table
| Dez | Hex | Okt | Name |
| 0 | 0x00 | 000 | NUL |
| 1 | 0x01 | 001 | SOH |
| 2 | 0x02 | 002 | STX |
| 3 | 0x03 | 003 | ETX |
| 4 | 0x04 | 004 | EOT |
| 5 | 0x05 | 005 | ENQ |
| 6 | 0x06 | 006 | ACK |
| 7 | 0x07 | 007 | BEL |
| 8 | 0x08 | 010 | BS |
| 9 | 0x09 | 011 | HT |
| 10 | 0x0A | 012 | LF |
| 11 | 0x0B | 013 | VT |
| 12 | 0x0C | 014 | FF |
| 13 | 0x0D | 015 | CR |
| 14 | 0x0E | 016 | SO |
| 15 | 0x0F | 017 | SI |
| 16 | 0x10 | 020 | DLE |
| 17 | 0x11 | 021 | DC1 |
| 18 | 0x12 | 022 | DC2 |
| 19 | 0x13 | 023 | DC3 |
| 20 | 0x14 | 024 | DC4 |
| 21 | 0x15 | 025 | NAK |
| 22 | 0x16 | 026 | SYN |
| 23 | 0x17 | 027 | ETB |
| 24 | 0x18 | 030 | CAN |
| 25 | 0x19 | 031 | EM |
| 26 | 0x1A | 032 | SUB |
| 27 | 0x1B | 033 | ESC |
| 28 | 0x1C | 034 | FS |
| 29 | 0x1D | 035 | GS |
| 30 | 0x1E | 036 | RS |
| 31 | 0x1F | 037 | US |
10.FAQ
Frequently asked questions or common issues
This chapter contains common questions I am receiving and their answers. Also, some common issues that may happen while using my App will be covered.
Where is WiFi scanning?
This is one of the most common question I am receiving. In general, this App does WiFi scanning as this is, what happens when performing a NetworkScan on your local network while being connected to your network via WiFi.
However, some of you expected a tool to discover WiFi Access points or even clients on the air. Since iOS 4.3, this is no longer possible with Apple devices. Apple (fortunately!) has removed all possibilities for an App to access the built-in WiFi network interface. Thus, such a feature you are looking for is not possible with iOS.
However, there is a nice workaround I am explaining in my blog.
Where is the Connections tool?
Since iOS 10, Apple has removed the ability to detect active connections. If you are using an older iOS version, you will see the tool. On newer iOS versions, this tool is hidden as it is useless. Some background information can be found in my blog.
However, there is now an alternative which just requires a bit work on your end. The solution is to install a Pi-Hole server on a Raspberry Pi which is described here. Along with the new Pi-hole Tool in NetworkToolbox you can now easily monitor all connections from your network to the outside.
Were are the MAC Addresses and device Vendor information?
Since iOS 11, Apple has removed the ability to obtain MAC Addresses and as MAC Addresses are being used to obtain the vendor of a device, both MAC Address and Vendor will no longer be displayed if iOS 11 or newer has been installed. Some background information can be found here.
However, to compensate this missing information, the Advanced Scanning feature has been added to NetworkToolbox. This feature will use additional techniques to obtain all available information about a network device which will then be used for network scans. In some cases, it can even still provide the MAC Address but in others it may just provide a name or other informative information. Read more about the Advanced Scanning feature in the corresponding chapter of this manual.
The App is crashing!!!
If this happens, I am sorry for that and that should not happen at all.
Developing this App has been and still is a challenge. Often, I have to code things in a way so that my App is either not rejected by Apple but also isn’t possible by using the standard API provided by Apple. Some of this has to be coded very low level in C whereas other parts are coded in Swift and Objective-C. C is old and not as stable as Swift and so it might happen that the App may crash in certain situations.
But again, this should not happen and has not been discovered during my tests and the during the tests of my beta testers.
I want to fix this. So please use the Support / Feature Request button inside the App to report this issue.
When starting the App it is slow and it takes a while until I can use it
This may happen, if there is a device on your network which is orphaned or didn’t respond correctly for standard network queries. This could be mainly an issue if you are using the “Advanced Scanning” features of the Network scanner. If you are experiencing these kind of issues, open the Network Scanner tool and switch off “Advanced Scanning”.
However, as such behavior is not normal, you may want to investigate which device is causing problems on your network and fix it.
How to clear the History?
For convenience and easier access, the App remembers your previous scans and entered / discovered Addresses. If you want to clear all this information for some reasons, just go to Settings -> Security and hit “Clear history list”. Here, you can also prevent the App from remembering by entering a zero for History list size.